My husband is a HUGE fan of anything blackened. Not all the time, but sometimes when we go out for dinner and blackened chicken fettucini is on the menu, he tends to order that.
One night I was trying to come up with a different way to cook chicken and decided I was going to try and figure out how to make blackened chicken. Surprisingly enough, it wasn't hard AT ALL and I had all the ingredients necessary on hand. So blackened chicken it was!
We realized how much we loved it and how easy it was after making it. Now it is for sure one that is on my go-to chicken recipe lists. I hope you enjoy it as much as we did!
Blackened Chicken
Ingredients:
1 large or 2 small boneless, skinless Chicken Breasts
Extra Virgin Olive Oil Cooking Spray
1/2 tsp. Paprika
1/8 tsp. Ground Cayenne Pepper
1/4 tsp. Ground Cumin
1/8 tsp. Dried Thyme
1/8 tsp. Onion Powder
1/8 tsp. Chili Powder
1/8-1/4 tsp. Garlic Powder
Directions:
- Between 2 pieces of plastic wrap (or place the chicken in a ziploc bag) use a meat tenderizer and pound the chicken to about 1/4-1/2 inch thick.
- In a small bowl, mix together all the dry seasonings.
- Once the chicken is pounded down, spray both sides lightly with the cooking spray and generously sprinkle the seasoning mix on both sides of the chicken. (You can sprinkle the seasoning mix on one side of the chicken and then put the seasoned side down in the pan to be able to season the other side if desired.)
- Pre-heat a skillet on the stove to medium-high heat. Place the chicken breast(s) in the pan. Allow the chicken to sear for about 5-7 minutes and then flip to sear the other side.*
- Once the chicken is seared, remove the chicken from the stove top heat and place in a 350 degree pre-heated oven and finish cooking until the juices run clear.*
*If desired you can finish cooking the chicken in the oven or you can cook it entirely on the stove top.
Serve with a salad or veggies and complex carb to round out your meal.
Hope you enjoy this and thanks for checking out my blog! Have a great day!
~Sarah Strubhar
Independent Team Beachbody Emerald Coach
Saturday, March 28, 2015
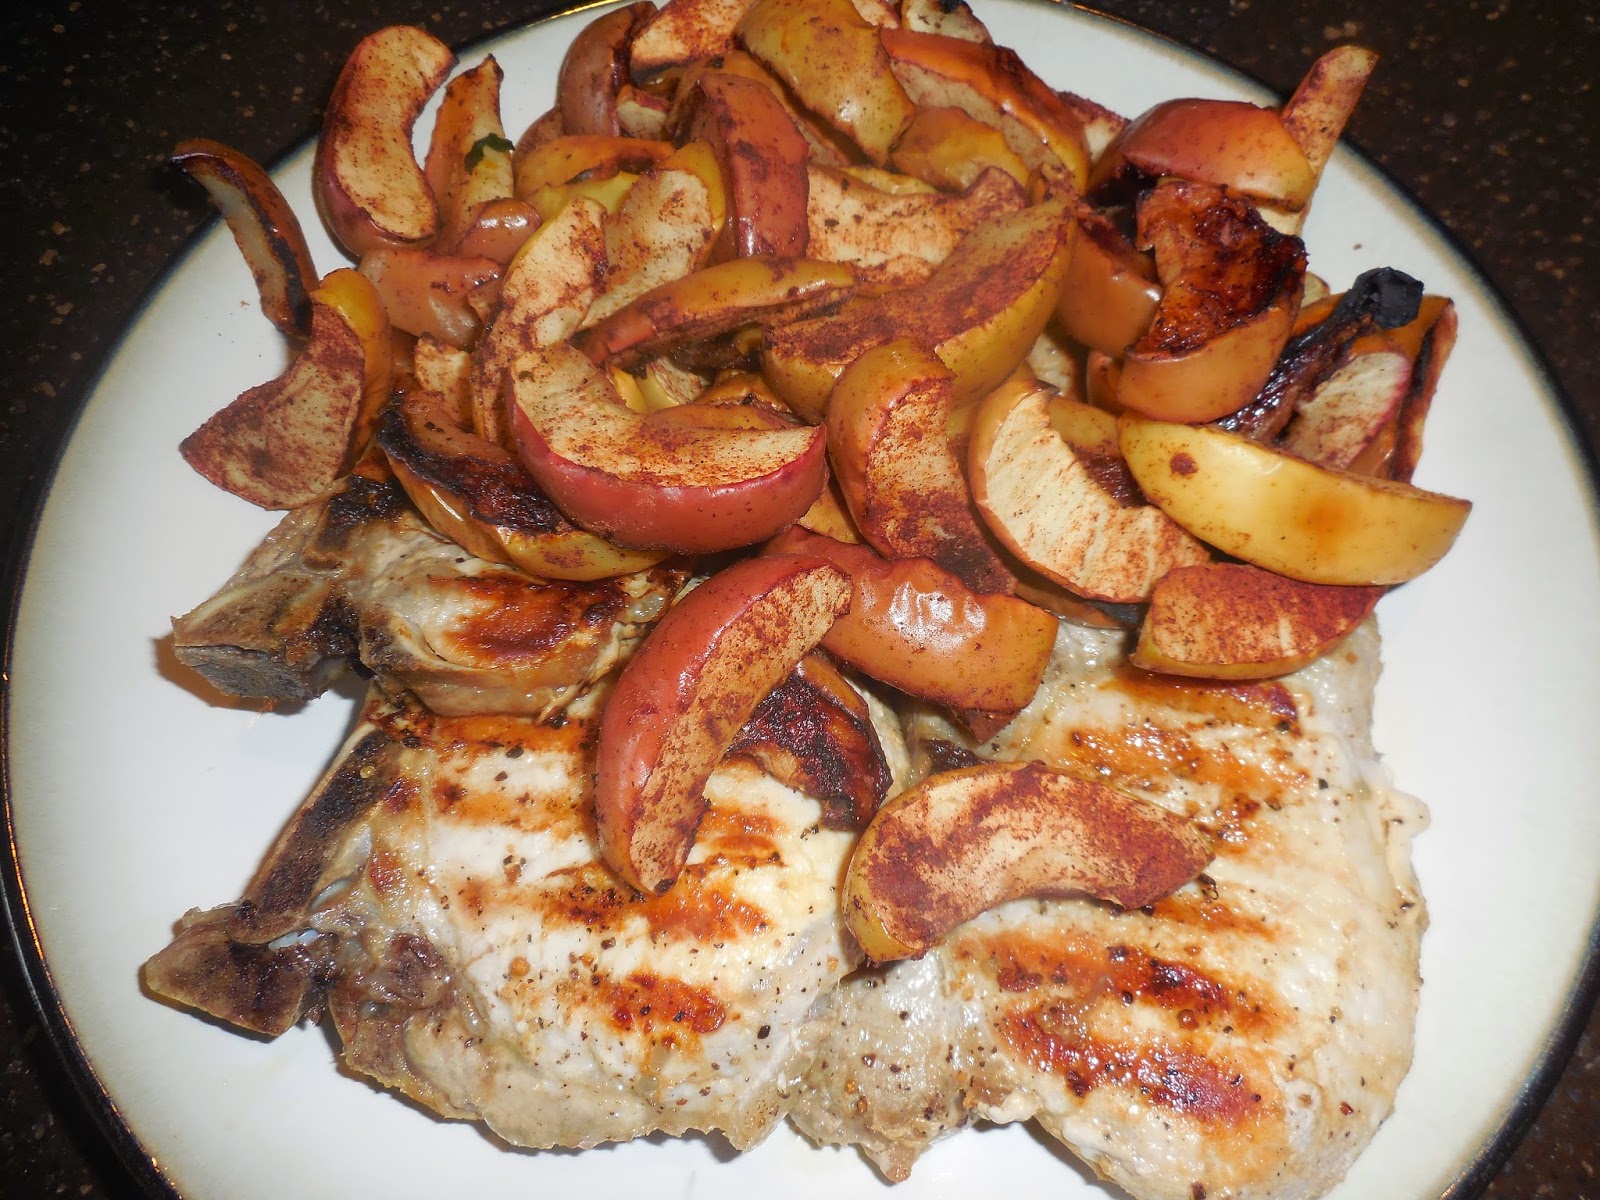
Pork Chops w/ Baked Apple Wedges
I don't know about you, but I have an AWFUL hard time turning down a pork and apple combination EVER! In fact, pre-clean eating days, I had found a recipe on how to re-create a very popular restaurant's Fried Apples at home. I would make a few batches of them and put them in the freezer for use either over pancakes or with pork chops.
- Season the pork chop with a little salt and black pepper. Grill, broil or bake the pork chop on both sides until heated through.
- Once the pork chops are cooked through and the apples are cooked, place the pork chops on a plate and top with the baked apples.
BUT, now, I have found that I don't need all those added ingredients (butter, brown sugar, etc.) to have awesome baked apples with my pork chops. I found this recipe and LOVE it. Not to mention, it is so much easier than those days of making the fried apples.
Hope you enjoy it!
Pork Chops w/ Baked Apple Wedges
1-5oz. Lean Center Cut Pork Chop per person
Sea Salt
Black Pepper
1 Apple, cut into thick wedges per person
1/2 tsp. Lemon Juice per Apple
Ground Cinnamon (could also use nutmeg & allspice if desired)
Directions:
- Pre-heat your oven to 375 degrees.
- Toss the sliced apple wedges with lemon juice and ground cinnamon; place on a rimmed baking sheet or in a shallow baking dish and cook until tender and bubbly (about 110-20 minutes or more depending on thickly sliced your wedges are.)
- Season the pork chop with a little salt and black pepper. Grill, broil or bake the pork chop on both sides until heated through.
- Once the pork chops are cooked through and the apples are cooked, place the pork chops on a plate and top with the baked apples.
For the 21 Day Fix meal plan, this would count as 1-Red, 1-Purple for the meat and apples and then add in the containers for your sides (1/2 sweet potato = 1 yellow; and then veggies of your choice for the green container).
ENJOY!!!
Thanks for checking this out and visiting my blog today! Have a great day!
~Sarah Strubhar
Independent Team Beachbody Emerald Coach
Friday, March 27, 2015
Roasted Butternut Squash w/ Spinach & Raisins
I have had a butternut squash sitting on my counter for a week or so now that I have been needing to use up and planned on making some for dinner last night. Well, yesterday afternoon I was flipping through a local grocery store flyer and saw a package of pre-cut veggies on "sale" that consisted of Butternut Squash, Spinach & Cranberries and all you had to do was cook them.
I thought to myself, now I could do that. I had the squash and spinach and had raisins instead of dried cranberries and thought well why not.
The outcome was FANTASTIC! In fact, I am considering making more tonight or to make asparagus, not sure yet! Now, why should I keep such a great recipe to myself, so here it is! It didn't disappoint!
Roasted Butternut Squash w/ Spinach & Raisins
Ingredients:
Butternut Squash, peeled & cubed (I measured out 2 green containers from 21 Day Fix for my squash for my serving)
1-2 Handfuls of Raw Baby Spinach (or more if you want)
A few thin slices of Onion
3/4-1 tbsp. Coconut Oil
Salt
Pepper
Garlic Powder
Handful of Raisins or Cranberries
Directions:
- Preheat the oven to 425 degrees.
- Once the butternut squash is cubed, place it in a baking dish with the thinly sliced onions, spinach.
- Pour the coconut oil over top and then sprinkle the salt, pepper & garlic powder over top. Stir around to make sure everything is coated well.
- Place the squash in the pre-heated oven and bake for 20-30 minutes, or until your squash is fork tender.
- Once the squash is tender, remove it from the oven and place in a serving bowl. Sprinkle a handful of raisins (or cranberries) over the squash, stir & enjoy!
*Now I know we are headed into spring, and I know butternut squash can be more of a winter kind of veggie, but I encourage you to give it a try if you haven't already! Also, note this was just for me my family doesn't tend to care for butternut squash much at all, so if you are making this for a crowd, you will need to increase the amounts listed.
Thanks for checking out this recipe! Have a great day!
~Sarah Strubhar
Independent Team Beachbody Emerald Coach
Wednesday, March 25, 2015
Steel Cut Oats vs. Old-Fashioned Oatmeal
Every morning I eat Oatmeal of some sort for breakfast and until recently I had only made myself Old Fashioned Oats for breakfast. For years, I have been told about Steel Cut Oats and to give them a try from a friend and I had yet to try them until last weekend. So, what is the difference between the Old Fashioned Oats and Steel Cut Oats?
The Basic Difference
Steel Cut Oats and Old Fashioned Oats all come from the same starting phase as oat groats with the outer husks removed. The biggest difference between the two is that Steel Cut Oats are oat groats that have been cut into two or three pieces so it is practically an unprocessed product. Rolled or Old-Fashioned Oats are made by steaming and rolling the oat groats to result in faster cooking. So, when the oats are cooked, you might find you have a different texture depending on which type of oat you go with.
Nutritional Value Info
When it comes to the nutritional value differences, there really is no difference in the amount of calories, protein, fiber, carbohydrates, and protein amounts. While gathering info for this post, I compared the nutritional value for the Quaker brand of Steel Cut Oats, Old Fashioned Oats and Quaker Quick Oats and other than the serving size, the nutrition facts were exactly the same.
Biggest Difference - Cooking Times
So, what really is the difference then? Pretty much from what I have figured out, the biggest difference is in the preparation! Typically you can cook the Old Fashioned Oats in the microwave in 3 minutes or so and the Quick Oats in about a 1 minute or so, BUT the Steel Cut Oats take at least 20-30 minutes on the stove top. HOWEVER, don't let the cook time scare you! Do you have a crock pot? If so, you can put the steel cut oats in the crock pot the night before, cook according to the directions on the package overnight and by the tim
e you wake up the next morning they will be ready! I did learn that the slower you cook the Steel Cut Oats on a low heat setting, the better they will be. The first batch of steel cut oats I made I didn't cook slow and low enough and they were extremely chewy! I made my second batch in the crock pot on the low heat setting for about 9 hours and they turned out GREAT! Oh yeah, and the BEST thing was when I made the steel cut oats in the crock pot, I made a double batch and have enough for 14 servings + the 1 serving I ate right away. Now, all I will have to do is put them in the microwave and re-heat. Within 30 seconds - 1 minute breakfast will be ready!
To cut down on the calories, I make my oatmeal with water, whether they are Old Fashioned Oats or Steel Cut Oats. For my mix-ins they depend on my mood, I mix in either frozen or fresh blueberries or strawberries, unsweetened all-natural applesauce, pure pumpkin puree (make sure it IS NOT pumpkin pie filling), honey or stevia, cinnamon, pure vanilla extract, nutmeg, all-spice, chia/flax seeds, etc. The flavor combinations are endless. I know my picture below may not look the prettiest, but it definitely is quite tasty.
Thanks for taking the time to read this and I hope you learned something new today.
The Basic Difference
Steel Cut Oats and Old Fashioned Oats all come from the same starting phase as oat groats with the outer husks removed. The biggest difference between the two is that Steel Cut Oats are oat groats that have been cut into two or three pieces so it is practically an unprocessed product. Rolled or Old-Fashioned Oats are made by steaming and rolling the oat groats to result in faster cooking. So, when the oats are cooked, you might find you have a different texture depending on which type of oat you go with.
Nutritional Value Info
When it comes to the nutritional value differences, there really is no difference in the amount of calories, protein, fiber, carbohydrates, and protein amounts. While gathering info for this post, I compared the nutritional value for the Quaker brand of Steel Cut Oats, Old Fashioned Oats and Quaker Quick Oats and other than the serving size, the nutrition facts were exactly the same.
Biggest Difference - Cooking Times
So, what really is the difference then? Pretty much from what I have figured out, the biggest difference is in the preparation! Typically you can cook the Old Fashioned Oats in the microwave in 3 minutes or so and the Quick Oats in about a 1 minute or so, BUT the Steel Cut Oats take at least 20-30 minutes on the stove top. HOWEVER, don't let the cook time scare you! Do you have a crock pot? If so, you can put the steel cut oats in the crock pot the night before, cook according to the directions on the package overnight and by the tim
e you wake up the next morning they will be ready! I did learn that the slower you cook the Steel Cut Oats on a low heat setting, the better they will be. The first batch of steel cut oats I made I didn't cook slow and low enough and they were extremely chewy! I made my second batch in the crock pot on the low heat setting for about 9 hours and they turned out GREAT! Oh yeah, and the BEST thing was when I made the steel cut oats in the crock pot, I made a double batch and have enough for 14 servings + the 1 serving I ate right away. Now, all I will have to do is put them in the microwave and re-heat. Within 30 seconds - 1 minute breakfast will be ready!
Each serving that came from the double batch of steel cut oats in the crock pot. |
Steel Cut Oats pre-flavored. |
Steel cut oats with pumpkin puree, cinnamon, honey, chia/flax seeds and pure vanilla extract. |
~Sarah Strubhar
Independent Team Beachbody Emerald Coach
Tuesday, March 24, 2015
Buffalo Turkey Burgers
I don't know about you, but we (my husband and I) love just about anything that has buffalo sauce with it not to mention we love new burger recipes. So when a friend introduced me to the original recipe a few years back, it was a DEFINITE to try. But, I have since adjusted the original recipe with a few swaps to make it more clean eating friendly. To make these kid friendly for my kids, I don't coat all the burgers in the hot sauce mixture, and the burgers are just as yummy!
Hope you enjoy it!!
Buffalo Turkey Burgers
Ingredients:
1lb. Ground Lean Turkey
Drizzle of Olive Oil
1 1/2 tsp. Poultry Seasoning
1 tbsp. Grill Seasoning Mix (I use McCormick's Montreal Original Steak Seasoning)
Garlic Powder (use as much or as little based on your taste preference)
4 Scallions finely chopped OR 1/4-1/2 Yellow/Sweet Onion, chopped fine or grated
1 Celery Stalk
1 1/2 - 2 tbsp. Olive Oil
1/4 cup Hot Sauce
4 Whole Wheat Tortillas or Whole Wheat Pitas (you could also use whole wheat burger rolls)
Dressing Ingredients (mix together in a small bowl):
1 cp. Non-fat Plain Greek Yogurt
1/2 cp. Blue Cheese Crumbles
Directions:
- Mix the first 7 ingredients in a medium-large bowl and combine using your hands.
- Make 4 equal burger patties and make the center of the burgers indented some so they don't puff up when you cook them.
- Pre-heat your grill or a grill pan to medium high heat.
- Place the burgers on the pre-heated surface and cook for 6 mins. on each side (make sure to cook the burgers until the juices run clear.)
- Once the burgers are cooked through, combine the 1 1/2-2 tbsp. Olive Oil and the hot sauce in a pan (You can use the same pan you cooked the burgers in originally if you want or you can use a small saucepan. Just make sure to use a pan that you are able to fit the burgers in, individually or all at once to be able to coat them with the hot sauce mixture.) Once the hot sauce mixture is combined, place the burgers in the mixture and turn to coat them at least once.
- If you are using the whole wheat tortillas or pitas, cut each burger in half and place them on the tortillas or in the pitas. Top each one with a small amount of the blue cheese dressing mixture.
- ENJOY!!!!
*Serve with a small side of sweet potato fries and/or salad to round out your meal.
(Sorry I didn't take any pictures when I made these last time, but I will be sure to get pictures next time I make them.)
Thanks for checking out my page! Have a great day and I hope you come back again soon!
~Sarah Strubhar
Independent Team Beachbody Emerald Coach
Friday, March 20, 2015
What is a Challenge Group???
It is the middle of March and April isn't too far away, YIKES! I don't know about you, but I went bathing suit shopping recently and HOLY COW the options that are out there. But are you thinking, I have been comfortable this winter, the sweaters have been great and oh no, what am I going to do? Have no fear I am here to help!
So you might have seen my posts in the past about joining a Challenge Group or been invited to join one of my Challenge Groups and wondered, "WHAT THE HECK is a challenge group?" For me a challenge group is a place where I can get AND provide support from those who want to improve their nutrition and fitness. That's pretty much the basics, BUT there is SO much more than that.
The group is a completely CLOSED & PRIVATE group run on Facebook. Only myself, fellow coaches part of the group and other challengers in the group will be able to see what goes on within the group. The group usually runs for 21, 30, 60 or 90 days.
You get meal planning help and ideas, the accountability of staying with a program or striving to meet whatever health and fitness goal you have set for yourself. The positive reinforcement that others in your life may not provide or even give as they might not have any idea how hard this is or how hard you are working. It is a place to go to when you might be having a bad day and just need that little boost to get you going.
Do you have to work out at the same time as everyone else?? No way! You workout for what fits best in your schedule. You just check-in with the Facebook group at some point during your day (or multiple times) as you are able. Having a rough day and not feeling like it, the group is the perfect place for you as the motivation that others in the group bring is unbelievable!
Believe me, I have been there and continue to struggle with motivation some days. BUT, I know there are others in the group counting on me and I don't want to leave any of the
m down. It is great surrounding myself with those that have similar goals and we can support and help each other through the rough times and celebrate with each other during the awesome times!
I was introduced to challenge groups during the summer of 2014 and had no idea what I was getting in to. In the 8 weeks of my first challenge group I participated in, I lost 9 pounds and 19.5 inches overall. I can say the challenge group got me there as I had not had those types of results EVER!
I also found the group to be a great place to go for ideas, help, to ask questions, and stay motivated. Not to mention the friendships and the growth in self-confidence that came from the group was AH-MAZING.
To be a member of one of my challenge groups, you only need to do 3 things!!
1. You need to purchase a Beachbody Fitness program of your choice.
- Not sure what programs are available or what program will work best for you, NO PROBLEM!! I will help you figure out what program is best for you! There are so many choices that no matter what your fitness level is or where you are in your life, we have a program for you! In addition to the program you will get a nutrition guide as well as a workout calendar to follow to make the process as easy for you as possible.
2. I need you to be drinking Shakeology (click for more info).
- 80% of your results come from your nutrition and diet. With Shakeology, you are guaranteeing you are getting at least one of your meals right and will keep you on track every day! Shakeology is NOT another protein shake or supplement, it has so much more to offer! There are NO artificial sweeteners, ingredients or soy ingredients in this shake AT ALL!
3. I need your 100% Commitment!
- With the group, I need you to have an open mind and a positive attitude. You need to be willing to work and participate in the group daily. This is your time to shine and take control of you! I will help you and support you, but YOU are the one who is in charge of your own success.
Does this sound like something that you are interested in? If so, complete the below form and submit it to me so I can get to know a little more about you and your goals and we can work together to get you to where you want to be.
Challenge Group Application
Are you interested in joining me in one of my upcoming Challenge groups? Please complete the form below so I can know how to help you reach your goals. I will be in contact shortly! Thanks so much!
- --
Thanks for your time and interest. I look forward to hearing from you!
~Sarah Strubhar
Independent Team Beachbody Emerald Coach
Wednesday, March 18, 2015
Broccoli & Cheese Stuffed Chicken Breast (21 Day Fix Approved)
Before my family started eating clean, I used to buy the frozen "hamster" style chicken breasts stuffed with either ham & cheese or our favorite - broccoli & cheese.
BUT, when we started eating clean, we haven't eaten them in what seems like FOREVER, so when a fellow Beachbody coach posted this recipe, I knew I had to try it. WE LOVED IT!
I will say I did coat my husband's with bread crumbs, but you can do without the breadcrumbs if you choose as I did for mine. If you don't coat it in the breadcrumbs this makes a great 21 Day Fix Approved Meal as well!
Hope you enjoy it!
Broccoli & Cheese Stuffed Chicken Breast
Ingredients:
Boneless, Skinless Chicken Breast (a whole chicken breast would count as 2 red containers or half would count as 1 red container)
Chedder Cheese (1 blue container or about 2tbsp.)
Frozen Broccoli, defrosted (1 green container or about 1cp. per chicken breast)
Olive Oil or Olive Oil Cooking Spray
Salt
Pepper
Onion Powder
Garlic Powder
Cayenne Powder
Paprika
Kitchen Twine
OPTIONAL:
Whole Wheat Panko Bread Crumbs OR Ezekial Bread breacrumbs
Whole Wheat Flour
1 Egg Beaten with a touch of water
Directions:
- Preheat the oven to 350 degrees. Cut at least 3 pieces of kitchen twine per chicken breast.
- De-frost the frozen broccoli and chop it into tiny little pieces and set aside.
- Place the chicken breast in a quart size baggie or between 2 pieces of saran wrap and pound the meat to about 1/2 inch thick.
- Once the chicken is pounded down, rub olive oil (or spray the chicken with the olive oil cooking spray) and then add the above seasonings as much or as little as you like.
- Next add a layer of cheese (if you are following the 21 Day Fix Meal Plan, make sure to save some to top the final chicken breast with prior to cooking). Then add the broccoli (you will likely not need an entire green container of broccoli as you will want to make sure you have enough room to be able to roll the chicken up.
- Roll the chicken up and tie it with the kitchen twine to help it stay closed during cooking. Then place it in a baking dish and top with the remaining cheese and additional spices if you want.
- Place it in the oven and bake for 30-45 minutes or until the juices run clear and cooked through.
OPTIONAL:
- If you want to bread the chicken, in three separate shallow dishes, place the flour, breadcrumbs & beaten egg.
- Then dredge a filled, rolled chicken breast first in the flour, then the egg, and then the breadcrumbs.
- Top with extra cheese and seasonings at this point if desired and place in the baking dish and bake as directed above.
NOTE: This is enough for one or two servings. If you are following the 21 Day Fix plan it would be one container for each additional chicken breasts. Also, since I am following the 21 Day Fix meal plan, I did not bread mine, but as I mentioned above I did bread my husband's.
I paired this with some brown rice and green beans to round out the meal, but you could omit the rice and serve it alongside just veggies as well!
ENJOY!!!
UPDATE 4/12/2015 - I made these again last night for dinner and I stuffed 2 with fresh baby spinach and feta cheese - oh my goodness were they delicious! I used about 1 cp. of fresh spinach and about 2-3 tbsp. of feta cheese. I seasoned it the same as above just changed up the filling. Going to keep experimenting with fillings. Want to try one with roasted red peppers, feta & spinach too sometime. Will let you know how that one is!
~Sarah Strubhar
Independent Team Beachbody Emerald Coach
Subscribe to:
Posts (Atom)