Wednesday, April 22, 2015

Unripe vs. Ripe Bananas


I was at the grocery store lately and the kids wanted some bananas.  We went to get some and Matthew said nevermind, I don’t want any bananas.  I asked him why he changed his mind and he said because they are to yellow and I only like green bananas.  Which got me thinking, are there any benefits or differences between eating a less ripe banana (more green/yellow green) and a more ripe banana (yellow/yellow with brown).  So I decided to do some quick research.  From what I found it looks like there are some differences, but nothing to drastic.

Upside of Green Bananas
One thing I think to be a benefit is that a less ripe banana has a lower sugar content, but has a higher starch content.  The higher starch in bananas is resistant starch which has a couple benefits.  First a resistant starch keeps us feeling full longer; plus it helps us burn fat quicker.  Also, there is a short chain of fatty acids in green bananas which is great for the intestines in our bodies.  This cell content of these chain fatty acids are eaten up by the cells that line our intestinal tract.  Which in turn keeps the intestine wall cells healthy and then they are better able to absorb other nutrients such as calcium more easily. 

Downside of Green Bananas
Let’s start with the less ripe banana.  A less ripe banana that has a more green or yellow green skin is much firmer.  Taking a bite of a green banana, will be more firm and could also be bitter as the banana isn’t as sweet since the sugars haven’t fully developed.  Also, a less ripe banana has particular proteins in that limit your body’s ability to digest the complex carbohydrates. 

Upside of Ripe Bananas
One thing that is definitely better (depending on your taste preference) is a ripe banana has a sweeter flavor and the texture is softer and not as bitter.  A more ripe banana is digested quicker than an unripe banana as the riper a banana the lower the level of resistant starch since the starch is converted to natural sugars as the banana ripens.   Also, one benefit of a ripe banana that I didn’t realize is that a ripe banana produces a substance called TNF (Tumor Necrosis Factor).  This substance give ripe bananas anti-cancer qualities that fight abnormal cells.  The more dark patches/brown spots, the higher its immunity enhancement quality can be.

Downside of Ripe Bananas:
To me the one downside that stands out to me is the fact the sugar content of a more ripe banana is higher than a green banana.  So, if you have type 2 diabetes or in the pre-stage of having type 2 diabetes, you might want to stay away for consuming a riper banana.  Finally, there has been a study done that shows there are some micronutrients loss as a banana becomes riper.  But, if you like a riper banana, one way to decrease the amount of vitamins and minerals lost during the ripening process, store/ripen the bananas in the fridge.

Conclusion:
So, I guess it all comes down to what your taste preference is and are you a pre-type 2 diabetic?  If you are pre-diabetic it would be more beneficial to avoid the more ripe bananas when possible.  Below is a chart that summarizes the differences between unripe vs. ripe bananas.

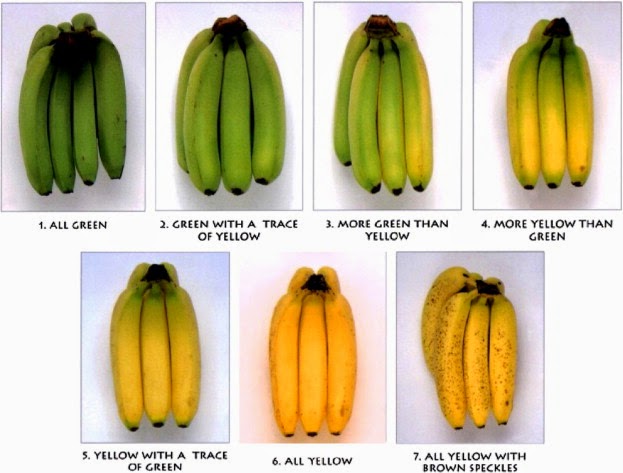
I can’t say I don’t blame Matthew on his banana taste preference.  I myself would rather eat bananas when they are on the less ripe side and are more yellow green (stages 3 and 4 in the picture above) than bright yellow/yellow with brown (stage 6 & 7 in the picture above).  However, I will say the riper the banana the better when it comes to making bread, muffins or adding to my shakes – YUMMY!


UNRIPE BANANAS
RIPE BANANAS
COLOR
Green
Yellow w/ Brown Spots
TEXTURE
Firm, waxy
Soft
TASTE
Bitter
Sweet, increased flavor
CARBS
40% Starch
8% Starch, 91% Sugar
GLYCEMIC INDEX
Low (takes longer to digest)
High (digests quickly)
CALORIES
About 90 (for a medium-sized banana)
BENEFITS
Feel fuller, burns fat faster, better for Type 2 Diabetics, more fiber
Anti-cancer quality, higher antioxidants


 I referenced the following sites during my research;  www.forlivingstrong.com and www.onegreenplanet.org.

Thanks for reading!

~Sarah Strubhar
Independent Team Beachbody Emerald Coach


Tuesday, April 21, 2015

Cheesesteak Stuffed Peppers

I may not be from Philly, but I LOVE a good cheesesteak.  I used to only be a beef cheesesteak kind of girl, but have grown to really love chicken cheesesteaks as well.  In the past I would stuff the bread full of the peppers, onions, mushrooms and meat and barely get the roll closed.  I love bread and thought I would miss the roll.  BOY was I wrong!  

Anyway, I have seen variations of this recipe off and on for a while and finally decided it was time to try it.  I can't wait to make it again in the very near future that's for sure!

INGREDIENTS:

1lb. Thinly Sliced Roast Beef (I used the Old Neighborhood Shaved Beef)*
8 Slices Provolone Cheese
2 Large Bell Peppers (I used green, but you could use whatever color you wanted)
1 Medium-Large Sweet Onion
12-16oz. Sliced Mushrooms
1tbsp. Coconut Oil (you could also use Extra Virgin Olive Oil)
Salt and Pepper – to taste
Garlic Powder - to taste

DIRECTIONS:

-  Slice peppers in half lengthwise, remove ribs and seeds.

-  Slice onions and mushrooms. Saute over medium heat in the coconut or olive oil, and garlic powder, salt & pepper (if desired). Saute until onions and mushroom are nice and caramelized. About 20-30 minutes.

-  Preheat oven to 425 degrees.

-  In a second skillet, place the shaved beef and cook over medium/medium-high heat until browned (about 10-15 minutes).  Once the beef is cooked add it in with the sauteed mushrooms and onions.

-  Line the inside of each pepper with a slice of provolone cheese.

-  Fill each pepper with meat mixture until they are nearly overflowing.

-  Top each pepper with another slice of provolone cheese.

-  Bake for 10-15 minutes until the cheese on top is golden brown.

Serve and Enjoy!!


Makes 4 servings – 6 net carbs per serving 

SOME THINGS TO NOTE:

-  *You could easily substitute Thinly Sliced Roast Beef (deli style) for the shaved beef instead.  Or even use chicken instead of beef (I can't wait to try the chicken in the future).
-  If you wanted an extra dose of peppers you could saute up peppers with the mushrooms and onions as well.  I only made the pepper stuffed with cheesesteak filling for me, the guys in the house had rolls with theirs so I did add additional peppers, but omitted them from my filling.
-  If you are following the 21 Day Fix plan, 1 red container of meat fit inside the container perfectly.  In addition, if you are following the 21 Day Fix meal plan, you could omit one of the pieces of cheese (depending on the number of healthy fats you are allotted based on your calorie level) if needed.
-  I used up my carb with sweet potato fries and a salad and was so full after dinner!  But it was a good full!

Thanks for checking out the recipe!  I hope you enjoy it as much as I did.

~Sarah Strubhar
Independent Team Beachbody Emerald Coach

Friday, April 17, 2015

Clean Eating Lemon Cranberry Cheesecake Bars

I LOVE CHEESECAKE! Which doesn't quite fit in the realm of clean eating.  In addition, I was looking for a dessert recently to enjoy on Easter weekend that wasn't going to be full of sugar and one that wouldn't make me feel a sugar headache.  So, when I found this recipe, I thought let's try it.  Definitely one that is a winner and a great healthier alternative to the regular cheesecake I love so much.  I hope you enjoy it!

Lemon Cranberry Cheesecake Bars

Crust Ingredients:
1 1/2 cp. Pecans
2 tbsp. Whole Wheat Flour*
1/2 tsp. Cinnamon
1/4 tsp. Salt
2 tbsp. Maple Syrup or Raw Honey

Filling Ingredients:
18oz. Lowfat Cottage Cheese (I used 1% small curd)
1 cp. Lowfat or Fat Free Greek Yogurt, plain
1/3 cp. Maple Syrup or Raw Honey
2 Eggs, Large (or 1/2 cup Egg Whites)
2 tsp. Pure Vanilla Extract
2 tbsp. Whole Wheat Flour*
1/4 - 1/2 tsp. Lemon Zest (optional - is fine without, but would definitely add another layer of flavor to the filling for sure)

Topping:
1/4 cp. Water
1/4 cp. Maple Syrup or Raw Honey
2 cp. Fresh or Frozen Cranberries** (I used frozen as fresh cranberries this time of year are pretty much non-existent)
1 tbsp. Cornstarch***
Zest of 1 Lemon (plus more for garnish)
Juice of 1/2 a Lemon
1/2 tsp. Pure Vanilla Extract

Directions:

- Preheat the oven to 350 degrees and line an 8x8 square baking dish with parchment paper, making sure to allow some overhang on the sides.  Set aside

-  To make the crust:  In a food processor, powerful blender, or something of the like, process the pecans into a fine crumble mixture.  Transfer to a medium bowl and add the flour, cinnamon and salt.  Stir to combine.  Add the maple syrup or honey and mix well.  Using your hands, press the mixture into the prepared 8x8 lined baking dish and set aside.

-  To make the filling:  Add all the filling ingredients to a food processor or blender (I used my normal blender which worked just fine) and process until everything is smooth and creamy for about 2-3 minutes.  Pour over the crust and bake for 60 minutes or until the cheesecake has set and the edges are lightly browned.


-  While the filling is baking, prepare the Topping mixture.  In a small saucepan, add the water and maple syrup or honey and bring to a boil.  Add the cranberries, lemon zest and juice, vanilla and cook on low for a few minutes or until the cranberries have popped.  Mix the cornstarch with a small amount of water and pour into the cranberry mixture to thicken the sauce.


-  Once the cheesecake is finished baking, remove it from the oven and pour the topping over and garnish with lemon zest if desired.  Let cool at room temperature for at least 30 minutes and then in the fridge for 2 hours.  Once cooled completely in the fridge, lift the cheesecake out of the using the overhanging sides of the parchment paper and cut into 16 squares.

To store, place in the refrigerator in an airtight container for up to 5 days or freeze for up to 3 months.

*For gluten free version, you can replace the flour with half the amount in cornstarch.  It will be fine in the filling, but the crust might get a bit soggy.
** You could also use blueberries, blackberries, raspberries or strawberries.  Next time I make them I will be using raspberries!
*** You could opt for chia seeds as the thickener instead of the cornstarch if you prefer as well.

ENJOY!!

Thanks for visiting!

~Sarah Strubhar
Independent Team Beachbody Emerald Coach

Monday, April 13, 2015

Clean Eating Enchiladas

You may or may not know this, but we love Mexican style food.  And as much as we enjoy it, it can be a challenge to find good, clean eating recipes that are super tasty.  Well, this one tops my list of faves for Mexican style food.  I was a bit anxious to make these recently.  I had never made my own sauce, not to mention I always get a bit anxious when I am going to make a new recipe.

BUT I am so happy I made these, they were SOOO tasty and I can't wait until the next time to make these.  Also, just a hint, this might be one of those meals that you could double when you make these to be able to put one in the freezer to use in the future.  (I know this recipe seems a bit tedious and long, but let me tell you IT IS WORTH IT and not as bad as it appears!)

Clean Eating Enchilladas:

Ingredients for the Sauce:

29oz. Can Tomato Sauce (could use canned tomatoes or crushed tomatoes as well)
5 tbsp. 100% Extra Virgin Olive Oil
1/8-1/4 cp. Fresh Cilantro Chopped (no stems), depending on your liking of the cilantro flavor
1/2 of a Sweet Yellow Onion
1/2 Red Bell Pepper
1/2 can of Rotel Tomatoes (with juice)
Ground Black Pepper, to taste*
Dried Cumin, to taste*
Chili Powder, to taste*
Garlic Powder, to taste*
Dried Oregano, to taste*

Ingredients for Enchilladas:

1lb. Extra Lean Ground Turkey (but could use ground chicken or super lean ground beef)
Whole Wheat Tortillas
3/4 cp. Shredded Cheddar Cheese
1/2 Sweet Yellow Onion
1/2 can of Rotel Tomatoes (without the juice)
1/2 Red Bell Pepper
1/2 cp. Sweet Corn
1/2 cp. Black Beans (drained)
1/8-1/4 cp. Fresh Cilantro (no stems), depending on your liking of the flavor of cilantro
Ground Black Pepper, to taste*
Dried Cumin, to taste*
Chili Powder, to taste*
Garlic Powder, to taste*
1 cp. Cottage Cheese

* You could also use 1/2 tsp. of Mrs. Dash's Table Blend, Southwest Chipotle or Chili Lime Seasoning Mix instead of the individual spices.  I didn't have any of those so substituted my own seasonings.

Directions:

-  Preheat oven to 350 degrees.

-  Start browning the turkey in a medium skillet on the stove.

-  While the turkey is browning,  Begin making the sauce.  Cut the yellow onion and bell pepper in half.  In a blender, combine all sauce ingredients EXCEPT the seasonings and blend them until they are smooth.

-  Once the sauce is blended, pour the sauce in a sauce pan and cook it on low, allowing it to simmer for at least 15 minutes seasoning with the dried spices until the flavors have developed to your likening.


-  While the sauce is simmering, chop the other half of the onion & pepper and add them to the browned turkey.  Saute turkey, onion & pepper together until they are soft.  Set the turkey mixture aside and allow to cook.

-  In a large bowl, combine the cottage cheese, Rotel tomatoes, drained black beans & corn and stir.  Once the turkey has cooled, add it to the bowl as well.  Add the dried seasonings to the meat mixture until your desired taste preference and mix until combine.


-  Spray a 9x13 casserole dish with cooking spray and begin prep to assemble your tortillas.

-  Line out the whole wheat tortillas and begin adding the meat mixture to your tortillas.  I chose to be generous with my filling as I wanted to fill up and enjoy the meat and not the carbs.


-  Once you have the tortillas filled, roll them and place them seam side down in the casserole dish.  I was able to fit 8 large tortillas in a 9x13 pan.

-  After you dish is full, pour the sauce mixture over the enchiladas and top with shredded cheese.


-  Cover the baking dish with foil and bake for 30 minutes.  After 30 minutes, remove the foil and bake for 15 more minutes.


Thanks for taking a look and I hope you enjoy them as much as we enjoy them!!

~Sarah Strubhar
Independent Team Beachbody Emerald Coach


Wednesday, April 8, 2015

Does this Journey Really Work?!?

Hello all!!!

Some of you have been following me for a while now and others are just beginning to read my story or follow me and you might be wondering if this shake I drink called Shakeology and these workouts of Beachbody's really do work.

Well, let me just share a little update from my personal story with you.  I recently was due to get my annual blood work from the doctor's drawn, you know check your cholesterol, thyroid function, and so forth and so on and I had been putting it off (got the blood draw order in January and just went last week).  First I just don't like getting blood drawn after a few bad experiences with past blood draws and blood donation tries; and SECOND, because I was nervous as to what my cholesterol was going to be.  Don't get me wrong, I know in my head & my heart I have changed a lot since a little over year ago when I had my last check done, but it is the anticipation and wonder as to if what I have done is really doing what it should be doing (lowering my cholesterol and helping me all around).

So, I fasted like I needed to and went last Thursday.  I didn't worry to much about it over the weekend, but Matt asked Monday if I had heard anything back from my results.  I hadn't and figured that was good right.  Well finally, I got a call from the doctor's office yesterday with my results.  And I am here to say, HOLY COW I was pleasantly surprised as to how things had improved in a year.

Here are my results:

2014:                            

Overall Cholesterol:  178
Triglycerides:  74 (the doctors want below 150)
HDL (good cholesterol):  54 (the doctors want above 40)
LDL (bad cholesterol):  124 (the doctors want below 160)
Cholesterol Ratio:  3.2

2015: 

Overall Cholesterol:  157 (down 21 points from 2014)
Triglycerides:  57 (down 23 points)
HDL Cholesterol (good cholesterol):  57 (up 3 points)
LDL Cholesterol (bad cholesterol):  100 (down 24 points)
Cholesterol Ratio:  2.75

Now you might be asking as I did because I am no medical professional, what does all this mean???   Well, it means that with a drop in my Triglycerides and LDL numbers and an increase in my HDL numbers, it means my risk for getting heart disease has dropped as well.

So, whereas about 3-5 years ago the doctors were talking about me needing to take cholesterol medication sometime in my future, after these results, I would say that currently that is likely NOT happening anytime soon.

To answer the initial question I posed, does the Shakeology and workouts work - YES MOST DEFINITELY for me they have.  With the combination of exercising, Shakeology and finally learning what the right foods are to fuel my body with, I can finally say I am seeing the difference medically as well as physically inside and out!

If you missed my earlier posts to give you a bit of background and where my journey started, you can find it here:  My Story and here for More of My Story.

If you have been wanting to give things a try, message me at sestrubhar@gmail.com or fill out the Challenge Group Interest Form Here and I will be in touch!

Thanks for following along and your time!

~Sarah Strubhar
Independent Team Beachbody Emerald Coach

Wednesday, April 1, 2015

Spinach Salad w/ Chicken, Strawberries & Blueberries

I am always trying to figure out new salad combinations.  Sometimes the usual salad I eat gets a bit boring. So, tonight I was putting together a salad for my husband and son and thought, well what kind of salad am I going to have.  I was out of romaine lettuce, but had some fresh spinach in the fridge which got me thinking, I also had some fresh fruit and I needed some protein with dinner so decided I would try and come up with something.  What I decided on was VERY tasty and all 21 Day Fix Approved!

Here it is!

Spinach Salad w/ Chicken, Strawberries & Blueberries

Ingredients:

2 cups Fresh Baby Spinach (2 green containers)
3-4 medium Strawberries
1/8-1/4 cup fresh Blueberries (combined the fruit is 1/2 purple container)
4-6oz. boneless, skinless Chicken Breast (1 red container) (I made a large chicken breast and used half of it)
6 Almonds Slivered (1/2 blue container)
Balsamic Vinegar

Directions:

-  Pre-heat a skillet or grill to medium heat.  Pound the chicken down to about 1/4" - 1/2" thick with a meat pounder and then spray the chicken with Extra Virgin Olive Oil cooking spray.  Season the chicken breast with salt & pepper.
-  Cook the chicken for 5-7 minutes on each side or until the chicken is cooked through and juices run clear.
-  Tear the baby spinach leaves and place in a bowl.
-  Top the spinach with the blueberries and cut up strawberries and blueberries.
-  Slice or chop the almonds and throw them in the bowl as well.
-  When the chicken is cooked through, thinly slice/shred the chicken to have pulled chicken and top the spinach, berries & almonds with.
-  Finally drizzle Balsamic Vinegar over the salad and ENJOY!

*You could also top with about 2tsp. of Feta cheese, if desired, which would equal the other 1/2 of a blue container.

*  And, you could omit the chicken and serve just as a side salad.

Thanks for checking my blog out.  I hope if you try the salad, you enjoy it as much as I did.

~Sarah Strubhar
Independent Team Beachbody Emerald Coach