Friday, November 13, 2015

Crock Pot Beef & Broccoli

I have been using our crockpot a ton lately.  Saw this recipe and wanted to try it.  We have never been huge fans of things made with soy sauce but have been up for trying new things lately.  I couldn't believe how tasty this was, not to mention EASY!!!

Score when the family approves and kept asking for more!

ENJOY!!

Beef & Broccoli

Ingredients:
2 lb Flank Steak cut into strips, width-wise (this makes for easier shredding at the end!)
2 cups Fresh Broccoli, chopped
4 Scallions, sliced length-wise (optional)
1/2 C low sodium Beef Broth
2 Tbsp. Liquid Aminos
Garlic Powder
1 tsp. Ground Ginger
1 tsp. Onion Powder

Directions:
-  Spray crock pot with non-stick Olive oil spray.
-  Place flank steak in crock pot.
-  If using green onions, sprinkle on top of steak. 
-  Mix together beef broth, liquid aminos, garlic, and spices, and pour over meat.
-  Cook on low 6 1/2 hours. 
-  Shred beef using 2 forks and add broccoli**. 
-  Cook an additional 30 minutes, or until broccoli reaches desired tenderness.

** I actually roasted our broccoli in the oven with some red peppers and served that along side the beef with some brown rice.

Monday, November 9, 2015

Slow Cooker Granola

Slow cookers aren't just for dinner and I am learning that more and more everyday!

Do you love granola! I DO!!!!!  BUT, I have always been too nervous to make it on my own!  I always thought you needed all these expensive ingredients to make it; or it would take too long; or I would burn it in the oven and there would be perfectly fine granola wasted.

BUT, not anymore!  I saw this recipe in a group I was in recently and knew I HAD to try it.  Seriously it couldn't have been any easier and tasty, well that's just not the word for it!  Thank goodness I have it in my head to only eat what it is per day to fit in my meal plan!  Because honestly, it wouldn't be lasting very long otherwise!!!

Here you go!  Try it out sometime!!

Slow Cooker Granola

Ingredients:

2 1/2 cps. Old Fashioned Rolled Oats (organic or gluten free if preferred)
1/4 cp. Nuts, chopped (almonds, walnuts, etc. - I used 1/8 cp. walnuts & 1/8 cp. almonds)
1/8 tsp. Sea Salt
1/3 cp. Pure Honey - organic if possible
3 tbsp. Extra Virgin Coconut Oil
1/4 cp. Peanut Butter (plain or chunky - your preference; organic if possible but not necessary)
1 1/2 tsp. Cinnamon (could use a bit less if you don't like the taste of cinnamon)
1 3/4 tsp. Vanilla (could use a bit less if you don't like the taste of vanilla)
1/4 cp. dried Fruit (raisins, cranberries, etc. I used 1/8 cp. of both)

Directions:
-  Coat the inside of your slow cooker with cooking spray (I use olive oil spray). 
-  Pour in oats, nuts and salt into slow cooker.
-  In a glass bowl, combine the honey, coconut oil, and peanut butter. Microwave for about 30 seconds until melted and you can combine smoothly. You may need to microwave more depending on your microwave. 
-  Stir cinnamon and vanilla into melted mixture.
-  Pour mixture over the oats in the slow cooker. Mix well so everything the oats are thoroughly mixed and coated. 
-  Place lid on slow cooker, but keep it slightly vented. I put my lid on just slightly sideways so it wasn’t on tight. 
-  Cook on high for about 1.5 – 2 hours, stirring every 15 minutes. It is important to stir it because it can burn a little if you don’t. The oats will be ready when they are moist but not wet.
-  Stir in dried fruit at the end. 


-  Spread granola out on a parchment lined baking sheet. Let the granola cool completely. The granola with actually harden a bit at this point and become that familiar granola texture.
-  Once cool, store in airtight container.
*There are so many possibilities you could mix in with this - sunflower seeds, dried apricots, apples, carob chips, etc.  You name it you could do it.  If you try this and try different mix-ins, let me know!  I would love to hear your feedback!

Thanks for stopping by and checking this out!  Have a great day!

~Sarah Strubhar
Independent Team Beachbody Ruby Coach


Wednesday, October 28, 2015

Chocolate Truffles!

I LOVE chocolate!  What about you?

What about chocolate candy or better yet TRUFFLES?!?!?  Found this recipe on Team Beachbody's website a while back and made them for one of my book club gatherings.  SCORE!!!! They were SOOO tasty and healthy and called for only a few ingredients.  Since making them the first time, I have made them again and change up the flavors.  I can't wait to continue making these again and trying different flavor combinations!

Chocolate Truffles

Ingredients:


5oz. Dark Chocolate (70% cocoa or higher), - I used Guittard 70% cocao chocolate the first time and Ghiradelli 70% cocoa chocolate, in my opinion, the Guittard was better
1 tbsp. Extra Virgin Coconut Oil, melted
1/2 cp. canned lite Coconut Milk
1/2 tsp. Extract (I have used Pure Mint & Caramel extract so far)
1/3 cp. unsweetened cocoa (optional)


Directions:
- Finely chop the chocolate and place in a small bowl.

-   Pour the melted coconut oil & extract in the small bowl with the chopped chocolate and stir together mixing well.  Set aside.

-  Bring the coconut milk to a gentle boil in a small saucepan over medium heat.

-  Add the heated coconut milk to the chocolate mixture and whisk gently to blend.


-  Cover the chocolate mixture and place in the refrigerator for a minimum of 4 hours or over night at least.

-  Using a mellon baller or spoon, scoop 1 tbsp. of chocolate mixture and roll into a ball.  Roll the ball into the cocoa powder until evenly coated if desired.  Repeat to make 12 truffles.

-  Store in the refrigerator for up to one week or the freezer for up to 3 months.

Just some of my notes:
- When I made the mint truffles, I dusted them in the cocoa powder.
- When I used the caramel extract, I added a twist of the sea salt shaker and didn't dust them with cocoa powder.
-  The possibilities are endless here.  I also thought of using cherry juice for a black forest twist, raspberry juice or almond extract.  You could also just make plain chocolate truffles and coat them in walnuts, peanuts, pistachios, pecans or whatever you like.

These are fantastic for a sweet treat to share at a party or as a gift.   Enjoy and let your imagination drive what flavor combinations you want to try next!

For those following the 21 Day Fix plan, 1 truffle equals 1 yellow container.

Thanks for stopping by!

~Sarah Strubhar
Independent Team Beachbody Ruby Coach

Chicken Noodle Soup - 21 Day Fix Style

We have been fighting colds this week and what better thing to battle a cold with than some homemade chicken noodle soup.  BONUS when it comes from a cookbook that helps with portions and keeps me on track for my nutrition.  I took the recipe from the recipe book and made a few slight changes.

Hope it warms you on a cool day or if you aren't feeling well!

Chicken Noodle Soup

Ingredients:

2 tsp. Olive Oil (or coconut oil)
1/2 cp. Onion, chopped
1 1/2 - 2cps. Celery, chopped (about 4-5 medium stalks)*
4 cps. Low Sodium Chicken Broth
3 cps. Rotissseri Chicken Breast (boneless & skinless), chopped**
1 1/2 - 2cps. Carrots, chopped *
1 tsp. dried Oregano
Sea Salt & Black Pepper to taste
1 1/4 dry Whole Grain (or wheat) Pasta - Penne, Rigatoni, bows, shells, etc.)***
Fresh Parlsey and/or Cilantro for garnishing (if desired)

Directions:
-  Heat oil in a large saucepan over medium heat.

- Add onions, celery & carrots cooking and stirring frequently for 3-5 minutes until the onions are translucent.

-  Add the broth, chopped chicken, carrots, oregano, salt & pepper.  Bring to a boil.  Add pasta & reduce heat to low and cook pasta for about 10 minutes until cooked through.

-  Top with cilantro and/or parsley before serving if desired.

My Changes:

*  Recently when I made this, I didn't have enough celery so instead of using the 2cps. of celery and 1 1/2cps. of carrots it calls for, I switched and used 1 1/2cps. celery and 2cps. of carrots. 
**I actually just cook 2 medium boneless, skinless chicken breasts and then chop them and use instead of a rotisserie chicken.
***You could also use a gluten free pasta, brown rice pasta or quinoa pasta for a gluten free spin.
****I also like to add in additional veggies when I make noodle soup, so I always add in frozen green beans and frozen peas at a minimum when I make chicken noodle soup.  I probably add about 1 to 1 1/2cps. of green beans and 3/4cp. of peas.  But, you could either add any other veggies of your choice or omit this if you didn't want to add them in.
*****You could also add in some dried thyme or and rosemary if you like.  When I cooked my chicken, I sprinkled thyme, parsley, rosemary on the chicken prior to cooking.

21 Day Fix Equivalents:  When made per the recipe above (without my changes), 1 serving equals 1 1/2cps. each for a total of 4 servings.  The container breakdown is 2 green, 1 1/2 yellow and 1 red.  However, if you throw in some extra veggies, the container breakdown would then be more like 2 1/2 green, 1 1/2 yellow & 1 red.

Thanks for stopping by!  Hope you enjoy and it warms your soul.

~Sarah Strubhar
Independent Team Beachbody Ruby Coach

Tuesday, October 27, 2015

Apple Picking and Apple Crisp!

Every fall I love to go apple picking with our family!  Last year we didn't go, so there was no way we were missing that this year.  However, there are so many different varieties of apples to choose from and I can honestly say we don't usually pick the same variety every year.

So, after picking nearly 20lbs. of apples, now the question comes, what are we going to do with those apples?  In the past I would make apple sauce full of sugar, apple butter, apple crisp, apple cake, apple dumplings, apple pie filling and whatever else I could come up with.  However, each one of these recipes that I had made in the past don't really align with the clean eating journey now.

BUT, problem solved when I found this recipe on Beachbody's website (but I have tweaked it a bit for our liking).  I have enjoyed it so much I have made it multiple times!  LOVE the fact that it only has a handful of ingredients!  This is fantastic on it's own.  PLUS I warmed a serving in the microwave this afternoon and poured it over some Greek yogurt this afternoon which was phenomenal!

Give it a try and let me know what you think!

Apple Crisp
*taken from teambeachbody.com

Ingredients:
4 cups peeled, sliced apples
5 Tbsp. pure maple syrup, divided use (original recipe calls for 3tbsp.)2 tsp. ground cinnamon, divided use (original recipe calls for 1tsp.)½ cup old-fashioned rolled oats¼ cup finely chopped raw walnuts

Directions:
1. Preheat oven to 375° F.
2. Combine apples, 3 Tbsp. maple syrup, and 1 tsp. cinnamon in a medium baking dish; mix well. Set aside.
3. Combine oats, walnuts, remaining 2 Tbsp. maple syrup, and remaining 1 tsp.cinnamon in a medium bowl; mix well.
4. Top apple mixture with oat mixture. Bake for 25 to 30 minutes or until apples are soft.

NOTE:  For my 21 Day Fix Lovers, 1 Serving equals 1 purple and 1/2 yellow and 1/2 blue or orange container.  This recipe serves 4.


Thanks for stopping by!  Enjoy!!
~Sarah Strubhar
Independent Team Beachbody Ruby Coach

Wednesday, October 7, 2015

Peach Rosemary Chicken Bake

I recently had a friend inquire about clean eating and if it is doable when eating gluten & dairy free.  My answer, was definitely.  So, I went on the hunt for some recipes.  This was one I found.  I changed it a little bit from the original as the original called for chicken thighs & I used boneless, skinless chicken breasts and used a different oil compared to the origianl recipe.  I also thought of cooking this in the crockpot but wanted to try it first with the way the original recipe indicated.  So, next time I make it, I will for sure do this in the crockpot.  Give it a spin and let me know what you think!

Peach Rosemary Chicken Bake

Ingredients:

2 T. Safflower Oil
1 Small Sweet Onion, sliced thinly
 4 Sprigs Fresh Rosemary, stems removed, chopped
1 ½ t. Sea Salt
¼ t. Pepper
3 Peaches, pitted, sliced
1/3 cp. Honey (if your peaches are really ripe, use 1/4 cp.  If your peaches are not very ripe use between 1/3 & 1/2 cup.)
¾ cp. Balsamic Vinegar
2 Large boneless, skinless Chicken Breasts

Directions:

- Preheat the oven to 375 degrees.

 In a large sauté pan, heat the safflower oil to medium/high. Add the onion, rosemary, salt and pepper, sautéing until the onion is translucent and soft, about 4-5 minutes. Add the peach slices to the pan and sauté with the onion for another 5 minutes. Add the honey and balsamic vinegar to the pan and bring to a simmer. Simmer for about 5 minutes, or until the sauce has reduced to a thick syrup. Do not reduce too long or the syrup will caramelize

- Place the chicken breasts in a lightly greased baking dish. Pour the peach/balsamic sauce over the chicken, spreading the peaches over the chicken evenly.

- Bake in preheated oven for 1 ½ hours, or until tender and cooked through.

-  Remove from oven and pour the liquid in the baking dish into a small saucepan.

-  Bring the liquid to a boil over high heat and let it boil down to a thick sauce, about 2-3 minutes.

-  Pour the sauce back over the chicken, evenly coating.

-  Serve & Enjoy.

*I served this with a sweet potato and a green bean, mushroom saute.  For the green bean recipe, click HERE.  


Saturday, September 19, 2015

Snow Peas & Red Pepper Saute - 21 Day Fix Approved

I know Snow Peas are not in season right now, but I was at the store the other day trying to think what vegetable to try next.  Snow Peas caught my eye so I picked some up.  BUT once I got home, I thought now how to prepare them other than just steaming them with some lemon juice maybe.  So I saw a recipe similar to this one but didn't have all the ingredients to use that exact one (surprise, surprise!).  Instead I decided to use what I had on hand and come up with my own combination.  Here you go!  Even with my own spin, this was one of the EASIEST and tastiest veggie side dishes I have made in a while!

Snow Peas & Red Pepper Saute

*with parmesan cheese
Ingredients:
1 lb. Fresh Snow Peas, trimmed
1 1/2 lg. Red Peppers, roughly chopped
2-3 tsp. Coconut Oil
Sea Salt
Black Pepper
Parmesan Cheese (optional)

Directions:
-  Heat the coconut oil in a large saute pan over medium/medium-high heat.
-  Add the trimmed peas and roughly chopped peppers to the pan.  Saute for about 5 minutes or until the peas and peppers are tender crisp.
-  Add salt and pepper to taste and sprinkle with parmesan cheese.  Stir to combine.
-  SERVE & ENJOY!!!!
*without parmesan cheese

* When I made this I measured the peas and peppers into my green containers and for myself I used 1 1/2 green containers of peas and 1/2 container of red pepper.  So totaled 2 green, 1 spoons.
*  For my husband, I used 2 1/2 greens of peas & 1 full green for red peppers to total 3 1/2 green containers & 2 spoons.

Thanks for stopping by!  Check back again for more recipes to come!

ENJOY!


~Sarah Strubhar
Independent Team Beachbody Emerald Coach

Tuesday, September 15, 2015

Peach & Jalepeno Salsa

Peach season is winding down to an end here in the northeast, but I wanted to share a recipe that I found on Team Beachbody's website this summer.  It is a great one if you are looking for a way to use up any peaches and want to try something that you otherwise might not have done.  It is FANTASTIC with chicken, pork chops, a hearty white fish (cod, halibut, etc.) or just a dipping salsa as well (I have used it with all of the above!)  Hope you give it a try sometime soon!

Peach and Jalepeno Salsa

Ingredients:
2 medium Peaches, peeled & chopped
1/4 medium Red Onion, chopped
1 medium Jalepeno pepper, seeds & veins removed & chopped
1/8-1/4 tsp. Crushed Red Pepper Flakes
2 Tbsp. Fresh Lime Juice
1/4-1/2 tsp. Hot Sauce (I used Texas Pete's Original)
1-2 tbsp. Fresh Cilantro, finely chopped (this may vary depending on your preference)

Directions:
In a medium bowl combine all the above ingredients mix well and set aside! (Seriously it is that easy!)

Top the protein of your choice or use it as a side for chips and salsa.

Hope you enjoy!!

Have a great day and check back again for more recipes!

Thank you!
~Sarah Strubhar
Independent Team Beachbody Emerald Coach

Tuesday, September 1, 2015

Pork Carnitas - Slow Cooker Style (21 Day Fix Approved)

I LOVE finding new recipes and I LOVE finding new twists on mexican style food.  Recently I have been trying to clean out our freezer, so I have been trying to come up with different things to make so we aren't eating the same thing over and over again.  One day I was trying to think of something to do with a pork roast I had instead of the usual pulled pork sandwich or traditional pork roast and I came across this recipe.  I figured, WHY NOT!  It was tasty and easy and not to mention, didn't call for anything out of the ordinary.  Definitely a bonus when I find a recipe to try and I have all the ingredients already.

Hope you give it a try and enjoy it!

Pork Carnitas - Slow Cooker Style

Ingredients:
4 lb. Boneless Pork Loin or Roast
1 tbsp. Chili Powder
1 tbsp. Ground Cumin
1 tbsp. Oregano
1 tsp. Sea Salt
1 tsp. Black Pepper
1 tsp. Garlic Powder
2 Onions, sliced
2 Oranges (medium)
1-2 Limes (depending on size and how much you prefer the lime flavor)
Corn Tortillas OR Whole Grain Tortillas

Directions:

1.  Spray your slow cooker with olive oil cooking spray.

2.  Place the pork roast in the crockpot.

3.  Layer the oninos on the roast.

4.  Squeeze the juice from the oranges and limes over the meat and onions.  Then put the entire fruit into the crockpot.

5.  Cover and cook on low for 6-8 hours.

6.  Once cooked, remove the pork roast from the crockpot and shred.  Save the juices in the crockpot but discard the oranges and lime(s).

7.  Return the shredded pork to the crockpot and rest it in the saved juices for 15-30 minutes.

8.  In the meantime, preheat your oven broiler.  Take the pork out of the crockpot with a slotted spoon and spread evenly on a rimmed baking sheet.

9.  Broil the meat until the edges of the meat start to look crispy - about 5 minutes.

10.  Serve inside the tortillas with desired tacos fixings (i.e. romaine lettuce, black beans, cheese, tomatoes, avocado, sour cream OR greek yogurt).

21 Day Fix Container Counts for 1 serving:

1-Red (pork)
1-Green (veggies on top)
1-Yellow (2 corn tortillas)
1-Blue (cheese and or veggies)

Thanks for stopping by!  Hope you come back soon!

~Sarah Strubhar
Independent Team Beachbody Emerald Coach

Monday, August 31, 2015

Buffalo Cauliflower Bites

I saw a recipe recently for some spicy cauliflower bites and when I went to make them I realized I didn't have all the ingredients in my pantry.  So instead I figured I would wing it and come up with my own spin on the recipe and use what I had in my pantry.  I don't know what the original recipe tastes like, but I know this one is MIGHTY tasty.

I took it to a friend's house this past weekend for dinner and it was GONE and gone QUICKLY!  Which is why I don't have a picture because I forgot to take one when they were done and there was nothing left to take a picture of at the end of dinner.

I hope you enjoy this as much as everyone that ate it there did!

Buffalo Cauliflower Bites

Ingredients:
1 head of Cauliflower
Olive Oil
Sea Salt
Black Pepper
Paprika
Cumin
Chili Powder
Hot Sauce (I used Frank's Red Hot Original)

Sauce Ingredients:
Greek Yogurt
Blue Cheese crumbled up (OR Hidden Valley Ranch Packet Seasoning Mix)

Directions:
-  Preheat the oven to 400 degrees
-  Clean and seperate the cauliflower into small floret pieces.
-  Spread the florets onto a rimmed baking sheet and sprinkle the olive oil over top.  Then sprinkle the sea salt, pepper, paprika, cumin & chili powder over to your liking.  Toss to make sure all the cauliflower pieces are coated well.
-  Bake in the oven for 20-30 minutes (until the florets are tender but crispy still).
-  Once the cauliflower is roasted, remove from the oven and pour into a serving bowl.  Then top with a few shakes of the hot sauce bottle to your liking (I probably used at least a 1/2 cp. if not more).

-  While the cauliflower is cooking, in a small bowl, mix about 1 cup or more of the greek yogurt with crumbled blue cheese to your liking.  (Depending on how much you like blue cheese will depend on how much you use.  If you don't like the taste of blue cheese, you could also use a Hidden Valley Ranch packet and mix up some ranch dip or use the fresh herbs of ranch and make that as well.)

I know I will be making this again sometime soon and when I do I will be sure to take a picture!

ENJOY!!!  Thanks for stopping by!  Come back again soon for more ideas!

~Sarah Strubhar
Independent Team Beachbody Emerald Coach

Sunday, August 9, 2015

Southwest Quinoa Salad

I have had this recipe on my list of "Want to Try" for what seems like forever now.  Finally decided it was time to try it out.  We were invited to a friends' house this weekend to share in some smoked beef brisket and decided to take this to share.  It's a good thing I had to share it, otherwise I would have eaten this all by myself with no troubles at all.  In fact, there was some leftover and when we got home at 10:30p.m., I decided I wanted a few more bites and it was just as delicious then as it was hours before.  Hope you enjoy this as much as I did as well as everyone who tried it at the cookout!

Southwest Quinoa Salad

Ingredients:
1 cp. Quinoa, rinsed & drained
1 tsp. Ground Cumin
2-3 ears of Corn on the Cob
15oz. can Black Beans, rinsed & drained
2 Plum Tomatoes, diced
1 med. Zucchini, diced
1/4 cp. Red Onion, finely chopped

Dressing Ingredients:
1/3 cp. Fresh Lemon Juice
1/3 cp. Extra Virgin Olive Oil
1 1/2 - 3 tbsp. Fresh Cilantro, chopped (there is such a range in the amount to use depending on your taste preference for fresh cilantro)
Sea Salt & Fresh Ground Black Pepper, to taste

Directions:
-  In a small bowl, whisk together the ingredients for the dressing and set aside.
-  In a small saucepan, bring 2 cups of water to a boil and add the quinoa & ground cumin.  Cover and reduce heat to medium low and simmer until the liquid is absorbed (about 12-15 minutes).  Remove from the heat and let stand for 5 minutes.  Uncover the cooked quinoa and fluff with a fork.  Allow the quinoa to cool for at least 10 minutes.  (I left mine cool for a while and it was at room temperature when I was ready to move forward.)
-  While waiting for the quinoa to cook and cool, bring a pan of water to a boil and place in the ears of corn.  Boil for about 5-10 minutes.  Then remove from the water and place on a pre-heated grill and grill until the corn becomes tender and lightly charred.  Removev the corn from the grill and allow to cool completely.  Once cooled, cut the kernels from the cob.
-  In a large bowl, combine the quinoa, corn kernels, black beans, diced tomatoes, diced zucchini & finely chopped red onion.  Pour the dressing over top and toss to combine.
-  Cover and refrigerate for at least 1 hour or up to 2 days prior to serving. 
-  ENJOY!!!

Thanks for stopping by and checking out my recipe.  Come back and comment if you try this and let me know what you think!

Have a great day!

~Sarah Strubhar
Independent Emerald Team Beachbody Coach

Friday, July 10, 2015

Honey Pecan Chicken - Slow Cooker Style

This week has been all about trying new recipes.  We have tried 2 new chicken recipes and 1 new steak recipe.  All of which have not disappointed.  Yesterday was a crazy busy day and I knew in order to have an easy dinner I needed a crock pot meal.  I found this recipe recently and decided it was time to give it a try.  It was sweet & salty and was a nice twist on regular chicken.  BONUS I had all the ingredients in the house (since I usually keep an assortment of nuts in the freezer).

Here you go!

Honey Pecan Chicken - Slow Cooker Style

Ingredients:

4 Boneless, Skinless Chicken Breasts (about 1 - 1 1/2 pounds)
Sea Salt & Black Pepper to taste
2 tbsp. Coconut Oil
2/3 cp. Raw/Pure Honey
1 cp. Chopped Pecans
Garlic Powder (to taste) - OR 3 cloves Garlic (minced)
1 tbsp. Italian Seasoning
Dash of Cinnamon
Handful Fresh Italian Flat Leaf Parsley (chopped - optional)

Directions:

-  Add the coconut oil to a large saute pan over medium-high heat.

-  Season the chicken breasts with the salt and pepper and add it to the saute pan.

-  Sear the chicken for 2-3 minutes per side, or until it is slightly golden brown.

-  While the chicken is searing, add the garlic, Italian Seasonings, and Cinnamon to the honey.  Stir & set aside.

-  Place the seared chicken in the slow cooker and pour the honey mixture over the top and sprinkle on the chopped pecans.  Set the slower cooker to low for 6-8 hours or on high for 4 hours.


-  Once cooked, remove the chicken from the slow cooker and cover with aluminum foil.  Let the chicken rest for 5 minute.

-  After the chicken has rested, you can either shred the chicken and add it back to the sauce OR serve the chicken breasts whole with the sauce drizzled over the top.  Finally top with a handful of fresh parsley if you wish.

- ENJOY!!!

Thank you for visiting.  Come back again soon!


~Sarah Strubhar
Independent Team Beachbody Emerald Coach

Tuesday, July 7, 2015

BANG BANG Baked Chicken

Recently we all went to Rehobeth Beach for a long weekend.  While there we went out to eat at a seafood restaurant and my husband wanted to order some BANG BANG Shrimp.  I had no idea what BANG BANG Shrimp was, but I figured what the heck why not.  And so glad I did, I loved it!  It was so tasty.

So, last week I was looking for some new recipe ideas to try and came across a recipe for BANG BANG Chicken.  I figured why not, I loved the shrimp, let's see how the chicken tastes.  And again, I was not disappointed.  The best part about making it at home was I could control the spiciness of it.  LOVE when I find a new recipe that is a hit and am able to add it to my collection.  Hope you enjoy it as much as we did!  And yes, the sauce calls for mayonnaise - which is why I am a huge fan of the 80/20 rule, I don't feel guilty when enjoying the sauce.

**Side note:  When I was making these, I did some before adding the hot sauce to the bread crumb mixture for the kids. Next time, I will probably add just a touch of hot sauce as that added to the flavor so much!

BANG BANG Baked Chicken

Ingredients:

For Chicken - 
4 Chicken Breasts, boneless, skinless, cut into small pieces/chunks (between 1 & 1.5 pounds)
1 cup Buttermilk
¾ cup Whole Wheat Flour
½ cup Cornstarch
1 Egg
1 tbsp. Garlic Powder
1 tsp Smoked Paprika
1 Tbsp Hot Sauce (I used Frank's Red Hot sauce)
Salt and Pepper to taste
Whole Grain/Wheat Panko Breadcrumbs

For Sauce - 
½ cup Mayonnaise
¼ cup Sweet Chili Sauce (I used Frank's)
1 Tbsp Frank's Hot Sauce
2 Tbsp Pure Honey

Directions: 

- In a medium bowl, mix all ingredients for the sauce together and refrigerate until ready for serving.

- Preheat the oven to 400-425 degrees.

-  In a medium bowl, mix flour, cornstarch, garlic powder, smoked paprika, salt and pepper. 

-  To the bowl add the hot sauce, egg, and buttermilk and whisk until you have a smooth batter. 

-  Add the chicken pieces to the bowl, toss to make sure each piece is coated in the batter and set aside.

-  In another bowl add about a cup of Panko breadcrumbs.

-  Coat each piece of chicken with breadcrumbs, add more breadcrumbs as needed, and place on a baking sheet (or a cooling rack over a baking sheet to help from keeping the pieces of chicken from getting soggy).

-  Place in the oven and bake for 15-30 minutes depending on how hot your oven is and how large the chicken pieces are.  I baked mine for about 20-25 minutes just to make sure they were cooked through which might have been 5 minutes to long, but they were extra crispy and good!

-  Drizzle chicken with sauce and serve.

**You could also use Extra Virgin Olive Oil and fry the pieces if you wanted.  I just don't like fried food much anymore nor did I feel like cleaning up the mess that goes with frying.

Wednesday, June 10, 2015

Sweet Potato, Chicken Sausage, Apple Zucchini Hash

Welcome back!  

I LOVE breakfast anytime of the day.  But I really love having breakfast for dinner.  However, when I do breakfast for dinner (aka brinner in our house), I like to find recipes that are heartier than just eggs and breakfast meat with a carb.  I found this recipe a month or so ago and love all the ingredients in it (except at the time the chicken sausage).  But, I thought it had been a while since I had chicken sausage, so why not give it a try.  WOW, they sure have come a long way with chicken sausage.  Now, I have made it a couple times and will likely make it next week again!  So tasty, filling, and the BEST PART IS it is 21 DAY FIX APPROVED!!!

Sweet Potato, Chicken Sausage, Apple Zucchini Hash


Ingredients:
- 2 Large Eggs
- Chicken sausage - cooked (1 container was 2 cooked links from Al Fresco Pepper & Onion Chicken Sausage)
- Zucchini, chopped
- Red Bell Pepper, chopped
- Red Onion/Scallions, chopped
- Sweet Potato, cubed and cooked
- 1 Apple, chopped
- 1 tsp. coconut oil
- Seasonings of your choice (I used sea salt & black pepper, but use whatever you like - garlic, etc.)
- A small handful of raisins or dried cranberries (if desired, but not necessary)

Directions:

- Using your 21 Day Fix containers, measure out 1 green of red onion, zucchini and bell pepper, 1 yellow of sweet potato, 1 purple of green apple and 1 red of chicken sausage. If you aren't using the containers, you can measure about 1 1/4 cup of the veggies, 1/3 cup sweet potato, 1/2 cup green apple, 4 oz of chicken sausage. These are NOT the same measurements as the Fix containers, but they are the best guess I can give to how much you can use. I highly recommend using the Fix containers if possible though because then you don't have to guess out your portions! Add the apples and veggies (except the zucchini) to a pan with coconut oil and cook on medium until almost fully cooked, 5-10 minutes. 


-  Once your veggies are pretty much cooked until soft, add the sausage and sweet potatoes to the veggies and cook for another 3-5 minutes.  If you choose to add the raisins or cranberries, add them in during the last minute of cooking.

-  Once your hash is all cooked together, remove from the pan.  Use the same pan to crack your 2 eggs in and make them however you like.  I like mine as close to over easy/medium as possible.  I will say this, the first time I made the eggs a little less runny than the second time.  I found the runnier the yolk was the better.  But, make them however you like!

ENJOY!!!

Thanks for visiting!  Hope you enjoy this as much as I did!

~Sarah Strubhar
Independent Team Beachbody Emerald Coach

Sunday, June 7, 2015

Roasted Broccoli

I used to be one of many people that the only vegetables I ate were green beans, corn, peas, and occasionally carrots & lima beans.  But over the past few months, I have started trying some new ways of preparing veggies.  I have found our new favorite way for broccoli (before I used to steer away from broccoli because steaming it just gets old after a while).  It is so tasty and yummy that honestly I will say that no matter how hot it is this summer the oven will be turned on for this.

Hope you enjoy it as well!

Oven Roasted Broccoli

Ingredients:
Broccoli Crowns, cut from stalk (I usually use about 2lbs., but use as much or little as you want)
Drizzle of Extra Virgin Olive Oil OR Coconut Oil
Sea Salt
Black Pepper
Chili Powder
Paprika
Garlic Powder (optional)
Shredded Fresh Parmesan Cheese

Directions:
-  Pre-heat your oven to 400 degrees.
-  Cut the broccoli flowers from the stalks and spread in a single layer on a rimmed baking sheet.
-  Drizzle the oil of your choice over.
-  Sprinkle as much or as little as you want of the salt, pepper, chili powder, paprika and garlic powder.
-  Then gently stir the broccoli around to make sure everything is coated.
-  Place in the pre-heated oven and bake for about 20-30 minutes, until the broccoli is soft,
-  Once the broccoli is cooked, remove from the oven and sprinkle the parmesan cheese over.  Stir the broccoli and allow the cheese to melt.

ENJOY!!!!!

Thanks for visiting.  Hope you enjoy this!  For more recipes check out the Recipes tab for some yumminess!

~Sarah Strubhar
Independent Team Beachbody Emerald Coach

Thursday, June 4, 2015

Slow Cooker Buffalo Chicken

As you might or might not remember, my husband and I enjoy many things that are buffalo chicken.  When I found this recipe on a fellow coach's blog, I knew I HAD to try it.  So, it was on the menu for last night.  There were so many good things about this recipe, it is a winner and will be on the recipe rotation list often.

Some of the great things:
1.  It is ONLY 4 ingredients.
2.  It takes no time at all to prepare.
3.  It makes enough to have for leftovers or freeze for the future.
4.  It is SUPER tasty
5.  Easy to do as a 21 Day Fix meal!

Slow Cooker Buffalo Chicken


Ingredients:
3lbs. Boneless, Skinless Chicken Breasts (fresh or frozen)
1 Bottle Hot Sauce (I used Frank's Original Hot Sauce)**
1 packet Hidden Valley Ranch Seasoning Packet
1/3 block 1/3 Fat Cream Cheese

Directions:
-  Combine the chicken, hot sauce and seasoning packet in the slow cooker.
-  Cook the chicken for 4-6 hours (or 7-8 if frozen).  Once the chicken is cooked, use 2 forks to shred the chicken.
-  Mix in the 1/3 block of cream cheese and allow the cream cheese to melt and blend the flavors together.

**If you don't like things overly spicy, you might want to use only a half bottle of hot sauce.

I served this as sandwiches for my husband on a whole grain roll.  I myself mixed it with some leftover roasted spaghetti squash and it was DELICIOUS!  Then I had some chicken left in my red container and decided since I had a yellow container remaining for the day, I placed a romaine lettuce leaf on top of a whole grain tortilla and then spread the chicken over it and ate it as a wrap.  Served along side a salad for a complete meal!

Thanks for checking out my blog.  For more clean eating recipes be sure to check the Recipes Tab!

Come back and visit soon!

~Sarah Strubhar
Independent Team Beachbody Emerald Coach


Friday, May 22, 2015

Slow Cooker Steel Cut Oats

I used to make old-fashioned oatmeal every morning and it would take me about 3-5 minutes which at the time wasn't a big deal.  BUT, after many, many months of hearing about Steel Cut Oats, I finally decided to give them a try.  The first time I made them, I didn't make them right.  However, I have since figured out the magic trick and LOVE making them.  Once I have them cooked I have at least 7 days worth of oatmeal for breakfast (but usually more considering I usually make 1 1/2 - 2 batches at once.)
Are you ready for the magic secret - USE YOUR SLOW COOKER!!  Here is how I make mine:

Slow Cooker Steel Cut Oats

Ingredients:
EVOO Cooking Spray
1 cp. Steel Cut Oats (I use Bob's Red Mill brand)
4 1/2 cp. Water
1 tsp. Salt (optional)

Directions:
- Spray a light coat of cooking spray around your slow cooker.
- Pour the water, steel cut oats and salt into the slow cooker.
- Place your lid on and turn the slow cooker on LOW.  Cook for 5-8 hours or overnight.  Stir occasionally if you can (especially if you are cooking this during the day).  Cook until the oatmeal is no longer chewy or is at the right consistency that you prefer.

-  Portion out in containers and store in the fridge.  (I use my yellow 21 Day Fix container to portion mine out.)

TO RE-HEAT:

I re-heat mine in the microwave for 1 minute (in 30 second intervals stirring halfway through).  Then I add pure vanilla extract, cinnamon, a tiny bit of honey & some flax/chia seed blend; but add whatever you like in your oatmeal!  ENJOY!

Paired with some protein and veggies/fruit and you have yourself a WELL balanced diet.  For a quick protein dish to pair this with check out the recipe for 21 Day Fix Approved Veggie Egg Cups here!

Veggie Egg Cups (21 Day Fix Approved)

I have become a HUGE fan of egg cups (aka mini quiches) depending on what the recipes calls them or what somebody you know calls them.  They are easy to prepare and are an AWESOME go to breakfast for me on those morning I am crunched for time.  I mean really, what could be better - eggs that have already been cooked but full of an entire serving of vegetables and they are ready in 1 minute!

Veggie Egg Cups
Serving Size: 2 muffin cups - 6 servings total

Ingredients:
Extra Virgin Olive Oil Cooking Spray
8 Large Eggs**
1-1 1/2 cp. Egg Whites**
Sea Salt & Ground Black Pepper (to taste & optional)
1-10oz. bag Baby Spinach, finely chopped*
1 Medium Red Bell Pepper, finely chopped
2 Green Onions, finely sliced (or use onion powder)

Directions:
-  Pre-heat oven to 375 degrees.
-  Lightly coat a twelve-cup muffin tin with spray
-  Break eggs into a large bowl and add 1 cp. egg whites.  Whisk to blend.  Season with salt and pepper, if desired.
-  Add spinach, bell pepper & onions (or onion powder to taste) and mix well.  (If egg mixture seems too thick, add more egg whites to it a little at a time.)
-  Evenly pour egg mixture into prepared muffin cups.
-  Bake for 15-20 minutes, or until a toothpick inserted in the center comes out clean.

NOTES:
*Next time I make these I was thinking of using broccoli instead of spinach.  If so, I will post the outcome.
**Also, the original recipe called for 12 large eggs, and I choose to substitute egg whites for 4 of the eggs.  But you could omit the egg whites and use only the eggs.


TO RE-HEAT:
I place 2 egg cups on a plate and cut them in quarters, and re-heat for 1 minute, checking at the 30 second mark.  Also, while I usually eat these with my steel cut oats (find the recipe here) every morning, you could easily eat these in a whole grain tortilla for a breakfast burrito spin for a balanced breakfast of healthy carbs, protein & veggies.

**21 Day Fix Approved - 1 Green Container & 1 Red Container (if you were to use a whole grain tortilla for a breakfast burrito you would use 1 yellow as well.)

Wednesday, April 22, 2015

Unripe vs. Ripe Bananas


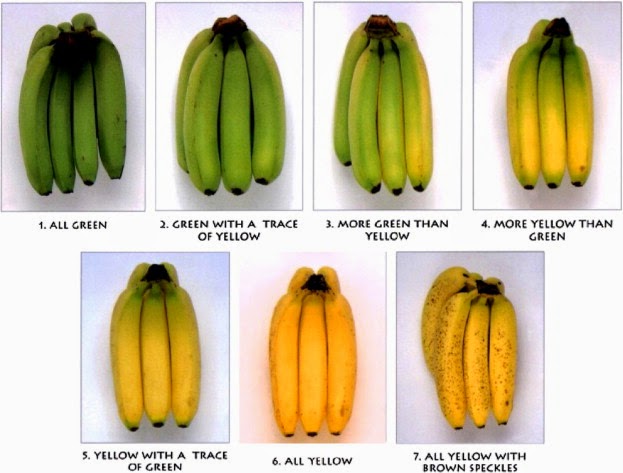
I was at the grocery store lately and the kids wanted some bananas.  We went to get some and Matthew said nevermind, I don’t want any bananas.  I asked him why he changed his mind and he said because they are to yellow and I only like green bananas.  Which got me thinking, are there any benefits or differences between eating a less ripe banana (more green/yellow green) and a more ripe banana (yellow/yellow with brown).  So I decided to do some quick research.  From what I found it looks like there are some differences, but nothing to drastic.

Upside of Green Bananas
One thing I think to be a benefit is that a less ripe banana has a lower sugar content, but has a higher starch content.  The higher starch in bananas is resistant starch which has a couple benefits.  First a resistant starch keeps us feeling full longer; plus it helps us burn fat quicker.  Also, there is a short chain of fatty acids in green bananas which is great for the intestines in our bodies.  This cell content of these chain fatty acids are eaten up by the cells that line our intestinal tract.  Which in turn keeps the intestine wall cells healthy and then they are better able to absorb other nutrients such as calcium more easily. 

Downside of Green Bananas
Let’s start with the less ripe banana.  A less ripe banana that has a more green or yellow green skin is much firmer.  Taking a bite of a green banana, will be more firm and could also be bitter as the banana isn’t as sweet since the sugars haven’t fully developed.  Also, a less ripe banana has particular proteins in that limit your body’s ability to digest the complex carbohydrates. 

Upside of Ripe Bananas
One thing that is definitely better (depending on your taste preference) is a ripe banana has a sweeter flavor and the texture is softer and not as bitter.  A more ripe banana is digested quicker than an unripe banana as the riper a banana the lower the level of resistant starch since the starch is converted to natural sugars as the banana ripens.   Also, one benefit of a ripe banana that I didn’t realize is that a ripe banana produces a substance called TNF (Tumor Necrosis Factor).  This substance give ripe bananas anti-cancer qualities that fight abnormal cells.  The more dark patches/brown spots, the higher its immunity enhancement quality can be.

Downside of Ripe Bananas:
To me the one downside that stands out to me is the fact the sugar content of a more ripe banana is higher than a green banana.  So, if you have type 2 diabetes or in the pre-stage of having type 2 diabetes, you might want to stay away for consuming a riper banana.  Finally, there has been a study done that shows there are some micronutrients loss as a banana becomes riper.  But, if you like a riper banana, one way to decrease the amount of vitamins and minerals lost during the ripening process, store/ripen the bananas in the fridge.

Conclusion:
So, I guess it all comes down to what your taste preference is and are you a pre-type 2 diabetic?  If you are pre-diabetic it would be more beneficial to avoid the more ripe bananas when possible.  Below is a chart that summarizes the differences between unripe vs. ripe bananas.

I can’t say I don’t blame Matthew on his banana taste preference.  I myself would rather eat bananas when they are on the less ripe side and are more yellow green (stages 3 and 4 in the picture above) than bright yellow/yellow with brown (stage 6 & 7 in the picture above).  However, I will say the riper the banana the better when it comes to making bread, muffins or adding to my shakes – YUMMY!


UNRIPE BANANAS
RIPE BANANAS
COLOR
Green
Yellow w/ Brown Spots
TEXTURE
Firm, waxy
Soft
TASTE
Bitter
Sweet, increased flavor
CARBS
40% Starch
8% Starch, 91% Sugar
GLYCEMIC INDEX
Low (takes longer to digest)
High (digests quickly)
CALORIES
About 90 (for a medium-sized banana)
BENEFITS
Feel fuller, burns fat faster, better for Type 2 Diabetics, more fiber
Anti-cancer quality, higher antioxidants


 I referenced the following sites during my research;  www.forlivingstrong.com and www.onegreenplanet.org.

Thanks for reading!

~Sarah Strubhar
Independent Team Beachbody Emerald Coach