Sunday, February 22, 2015

Healthy Chicken Parmesan - Baked NOT Fried

Chicken Parmesan has always been a favorite of mine.  However, I had only known about the fried version and never tried a baked version until I began this awesome lifestyle change.  I found this recipe from a fellow Beachbody Coach and have LOVED it more and more every time I make it.  In fact, this was one of the first 5 recipes I tried with my family and they all have loved it.  Just as a side note, my husband DOES NOT like tomatoes and all and he LOVES this with tomatoes and all!

It is a great recipe to entertain with or have as a family meal.  Each time I have made this for friends and guests, they have given rave reviews.

I hope you and yours enjoy this as much as we do!

Healthy Chicken Parmesan

Ingredients:
1lb. Boneless, Skinless Chicken Breasts
2 tsp. Dried Basil
1 tsp. Garlic Powder
1 tsp. Salt
1 tsp. fresh Ground Pepper
3/4 cup Mozzarella Cheese
1-15oz. can low sodium Chopped Tomatoes, undrained

Directions:
-  Pre-heat the oven to 350 degrees.

-  Put the chicken into a greased casserole dish and sprinkle the seasonings on both breasts. Top with the canned tomatoes and cover with aluminum foil.  Bake in the oven for about 30-40 minutes.

-  After about 30 minutes, remove the chicken and top with the mozzarella cheese.

-  Place back in oven uncovered for an additional 10 minutes or until cheese is fully melted.

-  Add a side of steamed broccoli with brown rice or quinoa and ENJOY!!!

(Sorry no pics, every time I make this I forget to take them and there isn't usually leftovers.)

~Sarah Strubhar
Independent Team Beachbody Emerald Coach

Crock Pot Apricot Salsa Chicken

I saw this recipe a couple months or so ago and have been wanting to try it.  So I finally decided I would.  It was pretty yummy and is SO SUPER easy!  I don't know what I like best the ease of it or the taste!  I hope you enjoy it!

Crock Pot Apricot Salsa Chicken

Ingredients:
1lb. Boneless, Skinless Chicken Breasts
1/2 cp. Fresh Salsa
1/3cp. - 1/2 cp. Apricot preserves
1 cup Frozen Corn


Directions:
Place all ingredients in a slow cooker as listed and cook on LOW for 6-8 hours until chicken pulls apart easily.

Remove from crock pot and serve with quinoa or brown rice and some veggies or a salad to make a complete meal.


ENJOY!!  Thanks for visiting!  Please check back soon for more recipes.


**October 19th, 2015 - I made this over the weekend with peach preserves as well.  Was still quite tasty and can't wait to have it sometime this week for dinner again!

~Sarah Strubhar
Team Beachbody Independent Emerald Coach


Pork Chop w/ Baked Apple Wedges

The combination of Pork Chops and Baked Apples is one of my favorite fall foods - oh wait, anytime of the year foods.  However, in the past, I used to use apple juice, bacon fat, brown sugar, or whatever combination thereof to make baked apples.  So when I saw this, I figured why not give it a shot.  I was so impressed with how the apples turned out that I won't ever go back to making baked apples with apple juice, bacon fat, brown sugar or regular sugar.

Here you go!  Hope you enjoy this recipe!

Pork Chop w/ Baked Apple Wedges

Ingredients:
4-5oz. Lean Center Cut Pork Chops (I usually use Boneless Pork Chops just to let you know)
4 Apples, cored and cut into thick wedges
2tsp. Lemon Juice
Cinnamon to your desired liking

Directions:
-  Pre-heat your oven to 375 degrees.
-  Toss your apples with the lemon juice, and cinnamon.  Place them on a baking sheet lined and place in the pre-heated oven.  Cook until the apple slices are softer and potentially bubbly.
-  In the meantime, broil, bake or grill your pork chop on both sides until cooked through. 
-  Serve pork chops and apple wedges along side a nice green salad, green veggies and enjoy!!!


Thank you for checking out the recipe!

~Sarah Strubhar
Independent Team Beachbody Emerald Coach

Chicken & Sweet Potato Hash

I needed a change this past fall with sweet potatoes and chicken.  I was getting bored with my traditional baked sweet potato and chicken.  I was on the hunt for something new to do with both ingredients.  I found this recipe on the Team Beachbody website and thought, what the heck - let's try it; what's the worst that can happen.

Well, obviously I must have liked it since those are the only kinds of recipes get posted.  So, if you are looking for a change, give this a try next time!

Chicken & Sweet Potato Hash

Ingredients:
8oz. Boneless, Skinless Chicken Breast cut into 1/2 inch strips
1 tbsp. Olive Oil
1 small Sweet Potato cut into 1/2 inch cubes
1/2 small Red Onion, chopped
1 Green Bell Pepper, chopped
Dash of Sea Salt
Dash of Black Pepper
1 tsp. Oregano
1/4 tsp. Cinnamon
1/2 tsp. Garlic Powder
1/2 tsp. Ground Ginger

Directions:
-  Pre-heat a medium sized skillet over medium heat and add the olive oil.

-  Sautee the sweet potato, onion, bell pepper, and spices for at least 5 minutes until the potatoes start to brown.  Keep in mind, you might need to saute the mixture longer though.  I honestly didn't time how long mine took, but I know it was longer than 5 minutes, probably more like 15-30 minutes.

-  Add the chicken breast to the skilled.  Cover and simmer about 8 minutes until the chicken is no longer pink & potato pieces are ford tender.  (However, you may have to cook longer.  It took me between 20-35 minutes,

Crock Pot Apple Cider Pork Roast

So not only am I a sucker for pumpkin recipes, I am almost an even bigger sucker for recipes that combine Pork & Apples.  There is just something about the flavors melding together of pork and apples.  When I saw this recipe posted by a fellow Beachbody coach, I knew I was going to make it.  The only thing better than the flavors of pork & apple together is the fact that this is done all in the crock pot!  Give it a try!

Crock Pot Apple Cider Pork Roast

Ingredients:
1 (3-4lb.) Lean Pork Roast
Meat Tenderizer (optional)
3 cups Apple Cider
2 Apples, peeled and chunked
1 Bay Leaf
1/4 tsp. Allspice
Salt & Pepper to taste

Directions:

-  Spray your crock pot with olive oil spray so it is easier to clean.

-  Tenderize the roast with meat tenderizer if desired.

-  Place the pork roast in the crock pot and season with salt and pepper.

-  Add the apple cider, apples, bay leaf & all spice.

-  Turn your crock pot on to high and let cook for 7 hours.

-  Roast is done with the meat falls apart.

ENJOY!!!

~Sarah Strubhar
Independent Team Beachbody Emerald Coach

Zucchini & Red Pepper Frittata

If you have read some of my other posts, you know how I love breakfast for dinner (a.k.a. Brinner).  One other thing I love is doing "brunch" dishes and casseroles to change things up once in a while instead of the traditional eggs.  I found this recipe on the Team Beachbody website this past fall and while I had never made a frittata at that point, I figured let's try it and YUMMY!!!  Pair this with a salad and you have a great well-rounded meal.

Zucchini & Red Pepper Frittata

Ingredients:
2 tsp. Olive Oil
3 medium Zucchini, thinly sliced
1 medium Red Bell Pepper, chopped
1/2 medium Onion, chopped
1/4 cup Fresh Basil, chopped
1/4 tsp. Sea Salt
6 Large Eggs
1/4 cup Crumbled Goat Cheese (1 1/2oz.)

Directions:
-  Heat oil in a 10-inch nonstick skillet over medium heat.
-  Add zucchini, pepper, and onion; cook, stirring frequently, for 2 minutes, or until zucchini is tender.

-  Add basil and salt. Increase heat to medium-high; cook, stirring frequently, for about 30 to 60 seconds, or until the moisture has evaporated.

-  Add eggs and goat cheese to vegetable mixture. Stir until combined; cook, over medium heat, without stirring, for about 2 to 3 minutes, or until the bottom is light golden. As it cooks, lift the edges and tilt the pan so uncooked egg will flow to the edges.

-  Reduce heat to low; continue cooking, covered, for 15 to 18 minutes, or until knife inserted in center comes out clean.

**I tend to make the Grilled Romaine with Walnuts Salad with this.  For the salad recipe, click HERE!


Nutritional Information - Yields 4 Servings (per serving):
Calories: 196
Fat: 12 g
Saturated Fat: 4 g
Cholesterol: 284 mg
Sodium: 302 mg
Carbohydrate: 8 g
Fiber: 2 g
Sugar: 6 g
Protein: 14 g

2 tsp. olive oil

Friday, February 20, 2015

Pumpkin Chocolate Granola Bars

I am a sucker for any recipes with pumpkin.  Don't ask me why, but I always have to give pumpkin recipes a try at least once.  So, I had to give these a try.  They were yummy!

Pumpkin Chocolate Granola Bars

Ingredients:
3 1/4 cup Rolled Oats
3/4 tsp. Cinnamon
1/2 tsp. Nutmeg
1/2 tsp. Salt
1/2 cup Pure Pumpkin Puree
1/2 cup All Natural, Unsweetened Applesauce
1/3 cup Honey
1/2 cup Dark Chocolate (at least 85% preferred, but I only had Dark Chocolate Chips, so I used those)
1/2 - 2/3 cup Sliced Almonds
1 tsp. Pure Vanilla Extract

Directions:
-  Pre-heat the oven to 350 degrees.  Spray an 8x8 baking dish with olive oil cooking spray and set aside.

-  Chop your dark chocolate into small pieces.  Again, I used dark chocolate chips, so I didn't chop mine, but I probably could have.

-  In a large bowl, combine the oats, cinnamon, nutmeg, and salt together.  Set aside.

-  In a medium bowl, whisk together the pumpkin puree, applesauce, honey, and vanilla extract until smooth.  Pour the mixture over the oats mixture and stir well, until the oats are moist.

-  Stir in the dark chocolate and almonds.

-  Pour the mixture into the 8x8 baking dish.  Press the mixture down and spread evenly in the pan.

-  Bake for 25-35 minutes or until golden brown.  (I baked mine for about 30 minutes.)

-  Keep in mind, the pumpkin keeps the bars moist, so make sure they are gold and set, you don't want them to be under baked.  Remove from the oven and let cool on a wire rack for 5 minutes.

-  Using a sharp, serrated knife, cut into bars.  Remove from the pan and let cool completely.

*Other Possibilities - you could also add dried cranberries or raisins to this for a good variation.

*Yields 12-16 servings.

 ENJOY!!!

Thanks for checking this out!

~Sarah Strubhar
Independent Team Beachbody Emerald Coach


Thursday, February 19, 2015

Chocolate Peanut Butter Granola Bars

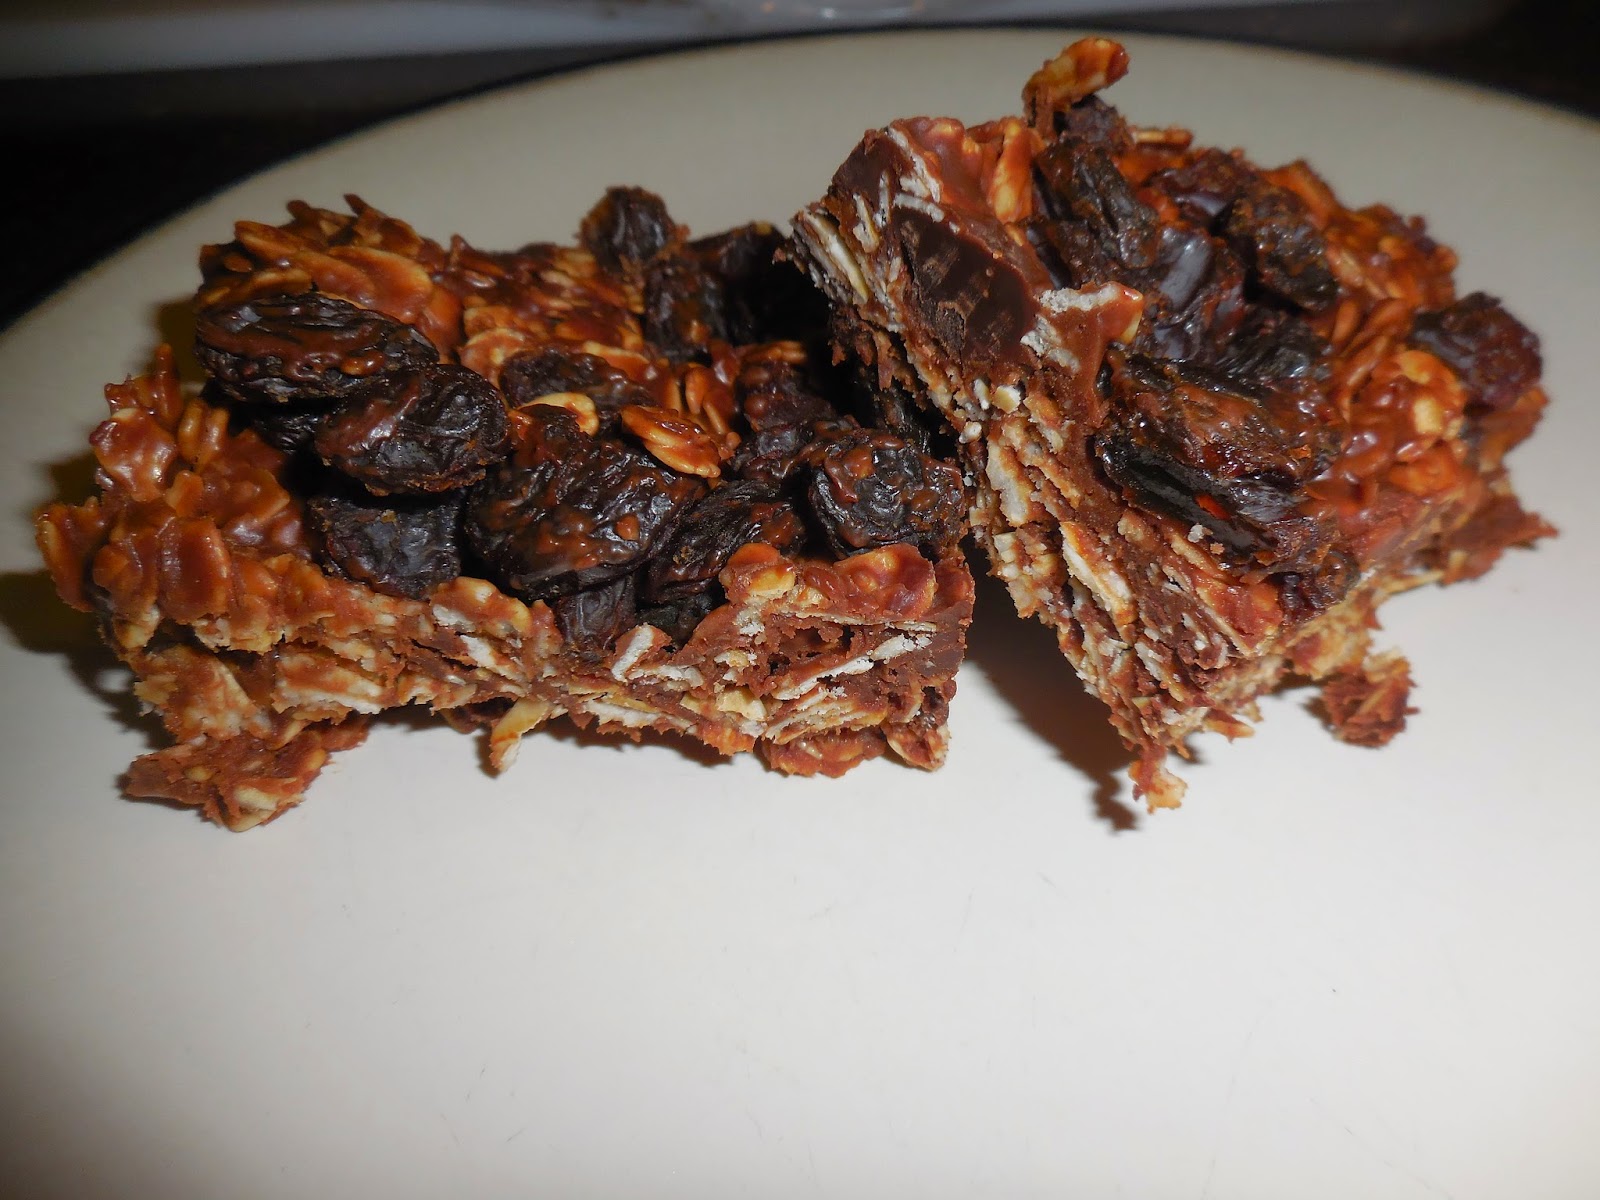
Matt & I are headed on vacation this weekend and going on a huge snowmobiling trip.  In the past, we usually go somewhere and ride out of one location for the whole week.  However, this time we are riding to a new location each day.  I am trying to plan and prep some easy snacks that can be enjoyed quickly but are still healthy.  I tried 2 different ones today.  Both were good, but this one was our FAVORITE!
Without raisins
With Raisins


Either way, they are both DELICIOUS!


Chocolate Peanut Butter Granola Bars

Ingredients:
2 1/2 cups Rolled Oats (I used old fashioned oats, but you could also use the quick oats)
1/2 cup Peanut Butter (I used smooth peanut butter, you could use chunky peanut butter OR Almond Butter if you wanted)
1/3 cup Honey
1/4 cup Butter
1 tbsp. Coconut Oil
2/3 cup Dark Chocolate Chips
Handful of Raisins (optional)
1/2 cup Shredded Unsweetened Organic Coconut (optional)

Directions:
-  Line an 8x8 baking dish with plastic wrap.

-  In a a medium bowl combine the oats and dark chocolate chips and coconut (if desired).  Stir to combine and set aside.

-  Place the peanut butter, honey, butter and coconut oil in a sauce pan over medium low heat.  Make sure to stir the peanut butter mixture constantly to keep it from burning.

-  Once the peanut butter mixture is well combined, add it to the bowl with the oats.  Stir immediately until the chocolate chips are melted and it is blended well.  The heat from the peanut butter mixture will melt the chocolate chips.

-  Pour the oat and peanut butter mixture in the lined 8x8 baking dish.  Smooth it out and if desired, press raisins on the top of the mixture (I only put raisins on half of mine to figure out if we liked the raisins or not).  Place the dish in the refrigerator for at least an hour to allow it to harden.

-  After at least and hour, take the dish out and pull the mixture up by the ends of the plastic wrap.  Place on a plate or a cutting board and cut into 16 squares.

-  Keep in the refrigerator in an air tight container.  I wrapped my individually in plastic wrap since I am traveling with mine.

Thanks for checking this out!  ENJOY!!!

~Sarah Strubhar
Independent Team Beachbody Emerald Coach


Wednesday, February 18, 2015

PiYo - Week 5, In the Books!

Hello Everyone!

Welcome back!  Week 5 came to an end over the weekend and the week was filled with continued improvement in my flexibility as well as other areas.  Week 5 brought in yet another NEW workout to do within the program, Sculpt.  In week 4, I began two different workouts and continued them this week as well - Drench and Strength Intervals.

Drench is so correctly titled.  It is a workout that works your entire body.  Half way through I am drenched in sweat and still have the second half to do.  Let's put it this way, my eyes were burning from sweat and it seemed like as soon as I wiped them there was more.  This workout pushed my limits in more ways than I thought possible.  The push-ups are improving day by day!

As for Strength Intervals, the previous week, when I pushed play for the first time, I thought for sure it was going to be more strength training than anything, however, I was wrong.  It is a 20 minute cardio workout that is great!  My first and continued thought after this workout is "wow who knew a 20 minute workout would raise my heart rate so much,"

The Sculpt program was another great full body workout.  For me the toughest part of the program was the 3rd series in the workout which consisted of a variety of push-ups.  The push-ups series begins with the toughest ones and progresses to a bit easier versions of the push-up.  However, I will say that I have noticed my strength to make it through the tricep push-ups has greatly improved.  I can actually do a few on my toes, which I never thought would ever happen from 3 years ago when I started doing tricep push-ups occasionally.

Definitely excited to make it through Week 6 and continue on with the program!


Have you missed my previous posts about the PiYo workout?  If so, here are the links to get you to my posts about Weeks 1-4:

Week 1
Week 2
Week 3 & 4

Thanks for checking in!  Are you interested in learning more on how you can get this AWESOME program?  Send me a message, I would love to help you reach your fitness & nutrition goals!

Until next week,

~Sarah Strubhar
Independent Team Beachbody Emerald Coach

Tuesday, February 17, 2015

More of MY Story

Welcome Back!

I have been doing some reading and listening to some YouTube videos about telling my story.  I also realized this past weekend, that some think I have always been fit and healthy and I haven't been.  I recently was asked where I get my motivation from.  Well read on below to find out.

I know I have an About Me page here on my blog, but I feel like I haven't given you my entire story.  I feel like I only gave you the story from the last 3-4 years or so.  So, hold on to your boot straps, because I am about to share more about me.

As a kid growing up, I was never "skinny" or what I thought to be skinny.  My sister could get away with eating whatever she wanted and it never affected her.  Me on the other hand was always what I like to call "big boned."  I was never skinny, but wasn't completely overweight either.  I was active and playing sports, softball, soccer, riding bikes and such, but was never skinny.  In fact, I remember there was a time when I was in 5th grade getting off the school bus crying from being called fat.  Wow, those were hurtful words.  Looking back I know that was just someone being mean, and to be called fat wasn't the easiest thing to hear, but knowing I was called that and how I felt only makes me imagine what others feel like when they are called that.

I was always to scared to wear a 2 piece bathing suit as a kid and teenager, so I was in a one-piece for so long, until my senior trip in 1999.  Even then, I wasn't completely comfortable with wearing a two-piece.

As a kid, my nutrition was never awful, but we did eat at those fast food restaurants, the buffets of the 1990s and such, but my mom was and is a FANTASTIC cook.

Fast-forward to high school and things remained the same.  I was in sports but never looked at myself as skinny.  I remember in high school looking at the pretty/skinny girls in school thinking I was never going to be pretty.  I mean how often do we think we are pretty enough or skinny enough?

Moving on to college, I would say like some that is where my nutrition really started to go downhill.  Granted I lived at home and commuted to school, but still I was eating at the student union building, eating at crazy hours of the day and skipping meals.  Where was my fitness level, come on did waiting tables carrying heavy trays of food or walking up 3 flights of stairs count???  Needless to say, by the time I got half way up those 3 flights of stairs to class I was winded and had to take a break.

I remember thinking to myself I would get in better shape.  My freshman year of classes, a high school friend and I commuted together and we decided we were going to go to the school's gym and start working out.  That lasted oh about 3 times and I never went back.  I remember going to the gym and seeing all these athletes (and I mean athletes) thinking to myself, yeah right they are looking at me and laughing, wondering what the heck am I doing there.

So, I went through college just never feeling motivated or the desire to be healthy.  UNTIL my senior year and I had a wedding in April of my senior year and knew I wanted to be a certain weight when I got married. So, my sister and I joined a gym right around the holidays that year and we went, we ACTUALLY stuck to it.  We would get up 3 days a week and be at the gym by 5:30am to workout for an hour and then go our separate ways for the day.  It helped having her there by my side holding me accountable, but nutrition wise, that never changed.  I was still eating the way I always had.  Did I meet my goal weight, YES I did the week before my wedding, and I was so proud of myself.  But, since I didn't have a goal in mind anymore, I stopped going to the gym.

After our wedding we moved to Portland, ME and where we were living there was a gym right around the corner, we joined there and that lasted for about 4-6 months, but again, I fell off the wagon and didn't go back.  We bought a house in May of 2004 and the winter of 2006-2007 I made a New Year's Resolution to get back to the gym.  We joined, but I can guess on 2 hands how many times I actually went.  I was working full time and didn't know how to make it a part of my daily routine.

In 2007, we moved again and this time where we moved, there was a gym right on the base.  I remember leaving Maine, saying I will be in the best shape of my life because I have a gym and it is FREE access.  Well, yep, again, that didn't work.  I can count on one hand how many times I went there.  But, I would take nightly walks with our dog.  I remember telling myself well hey at least you are walking and that is worth something.  Which it was, don't get me wrong, but knowing now what I know, it was better than nothing but still I needed to do more.

Holy cow, do you see a pattern here, every time I did something I would go less and less and then never go back.

I got pregnant with our first child in February 2008 and remember thinking throughout the early stages of my pregnancy, WOW I haven't gained that much weight, I am doing great.  Apparently all the extra pounds I am carrying are sufficient for the growing baby.  Little did I realize that even though I wasn't gaining much weight in the beginning it was all going to come on and quickly.  I was put on bed rest for my blood pressure being too high and HATED every minute of it, but knew that was safest for the baby.  I also remember going to the hospital and weighing 245 pounds.  When my pregnancy started I was around 205-210 pounds.  I look back at those pictures and realize why I never wanted pictures taken of me past my shower which was in August and being as huge as a house.  After having Matthew, I remember thinking to myself, I never want to be there again.

So, what did I do, we moved in May of 2009 and went back to walking every day for about 45 minutes.  But, in the January of 2010, I decided I was going to try and workout at home.  I went out and bought a Jillian Micheals DVD - and I would get up early and do the workouts.  But, again it lasted maybe 2-3 weeks.  I remember thinking holy cow I can't walk, but did I see any changes - NOPE.  Needless to say I stopped working out at home and struggled with my weight, blood pressure and the feeling of being tired and sluggish once again, which lasted until we moved in May 2011.  I even had to monitor my blood pressure for a few weeks at home because my doctor at the time wanted to put me on blood pressure medication - I was 28 years old and was determined NOT to go on medication for my blood pressure as I knew once I started it, I would have a difficult time not taking it in the future.

So, we moved once again in May 2011 and  I continued on my typical up and down roller coaster above.  I even tried walking a couple times a week but we weren't living in an area conducive to walking.  So, I didn't even do that.  In November/December of 2012, my husband and I discussed having a baby and he was worried about me having the same issues I had with my first pregnancy so we made a deal to meet with my doctor and get their opinion.  And if you have read my ABOUT ME
page, the rest is history.  The doctor is who encouraged me to get in shape and start working out.  I figured I would exercise 3 days a week and she is the one who told me workout 5 days a week at least.  Shortly after starting at the gym, I had a free evaluation by one of the trainers and part of that evaluation included getting on a body mass scale.  I remember leaving the gym with a slip of paper and seeing the "Ideal Weight" on that paper and thinking - ARE YOU KIDDING ME???  There is no possible way I will ever see that weight.  I wasn't even that weight when I got married.  I have kept that paper for nearly 3 years and I would look at it occasionally thinking "never in a million years."
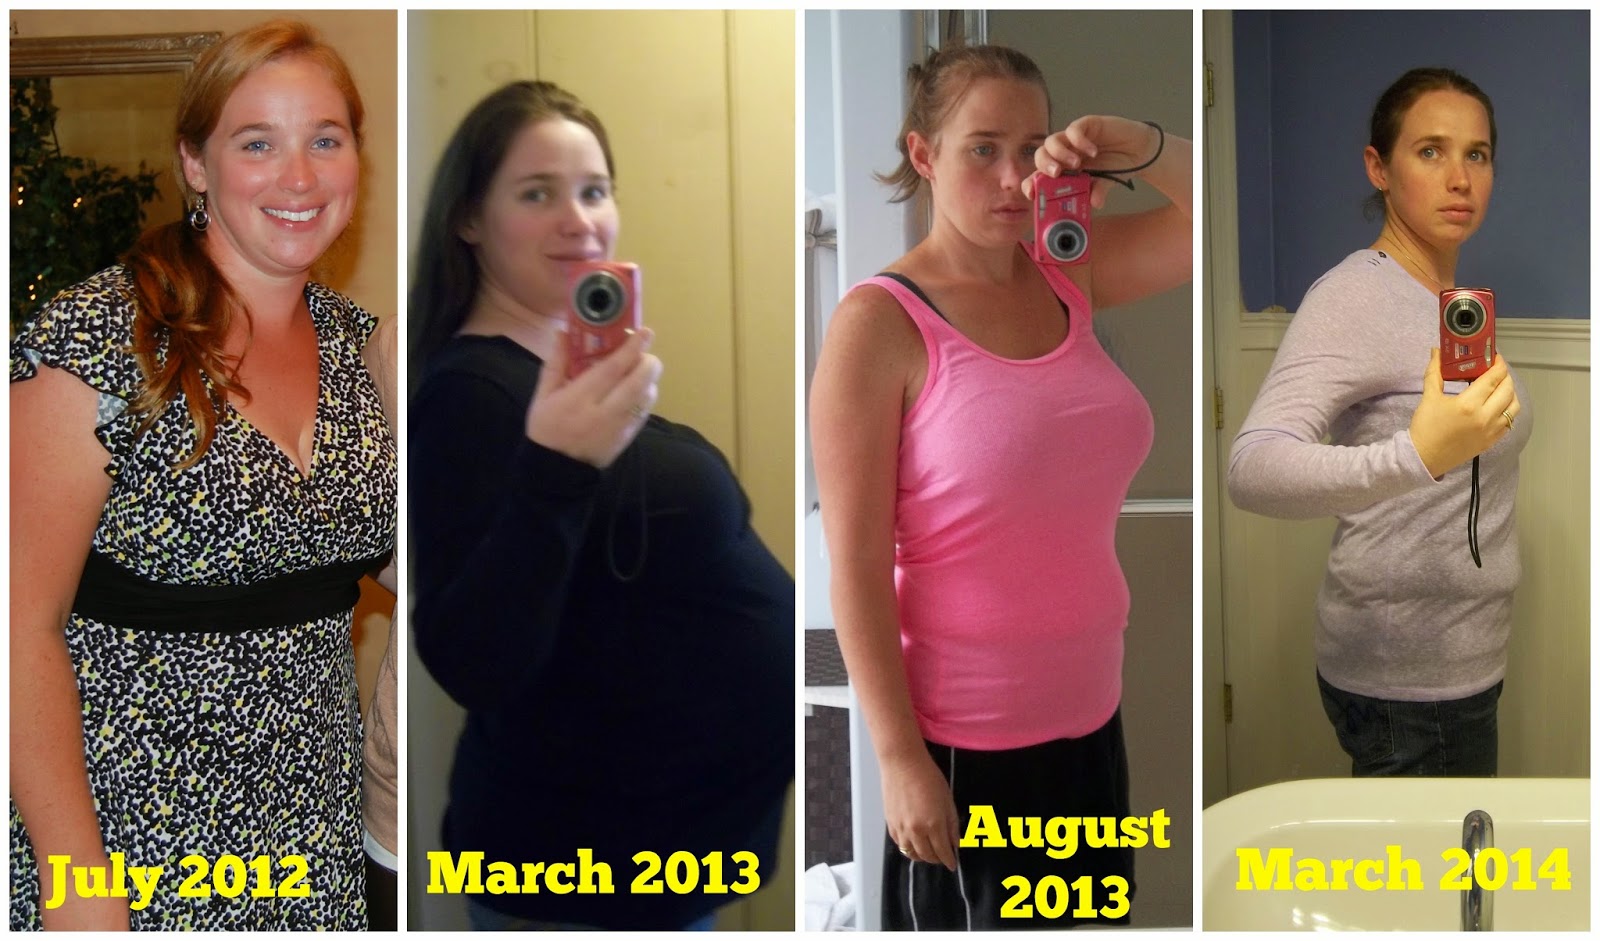
So, what does all this come down to?? Well, since I started my journey of more focused on working out, Shakeology and Clean Eating, I have managed to lose about 60-70 pounds from where I was in 2008 (about 40 pounds from 2012 to date).  In addition, I no longer have issues with my blood pressure and crazy as it sounds I weigh less than what I weighed when we got married.  You know that "ideal weight" I mentioned above, I have actually met and maintained even a few pounds below that for the last 4 months.  As for how my cholesterol has been affected and other blood levels, I am due to have blood work done and will be excited to see what changes have come from last winter to this winter, I can't wait.

Now, don't get me wrong this is a struggle each and every day of the week, but I know this is a lifestyle change NOT a fad diet or a quick fix.  This is one day at a time for me and every day I face temptations that I face head on.  Each day I wake up and put one foot in front of another and I can honestly say, the Facebook Challenge Groups that I joined this past summer helped get me moving.  But, now I help run them and each and everyone of my fellow challengers in the group keep me motivated.  I know they are working just as hard as I do each day and they help keep me motivated and accountable.  Not to mention my son helps me stay accountable when he asks "mommy did you get your workout in this morning?"  I am loving how I feel and have never felt better in my life.

In fact, I am FINALLY happy with where I am with my body and have come to realize that while I may never be "perfect" with the "awesome 6-pack" some have, I am FIT, HEALTHY, and likely in the best shape I have ever been.  I LOVE setting the example for my kids and family and knowing that there are people I have played a part in inspiring others.  I remember thinking in August, if I could just inspire one person, then that is what I want to do.  Now, I want to help pay forward everything I have learned and help you reach your goals!

I hope you have been able to understand a little more about me and where I have come from and how I have gotten here!  If you are interested in learning more about how I can help you, please contact me as I would LOVE to help you out!

 ~Sarah Strubhar
Independent Team Beachbody Emerald Coach


Pumpkin Protein Pancakes

In honor of National Pancake Day today, here is a recipe I recently tried and they were very tasty.  We have breakfast for dinner (a.k.a. Brinner) about once a week and sometimes it is nice to switch things up from the traditional eggs.  So last week one night Matthew wanted waffles, so I made him waffles but also made some of these to have as another option.

I thoroughly enjoyed them and was quite full feeling when I was done with just one.  (As a side note, I also scrambled up 1/2 cup of egg whites with broccoli & salsa.)

Try these next time you are craving a pancake!

Pumpkin Protein Pancakes
Photo courtesy of Melanie Mitro.

Ingredients:
6 Egg Whites (which equaled 1 1/2 cups of liquid egg whites)
1/4 cup Canned Pure Pumpkin
1/2 cup Low-Fat Cottage Cheese
1 tsp. Pure Vanilla Extract
1/2 tsp. Cinnamon
1/4 tsp. Nutmeg
1/4 tsp. Allspice
Pure Maple Syrup

Directions:
Mix all ingredients together in a mixing bowl.  Spray a pan with clean cooking spray (I used Extra Virgin Olive Oil Cooking Spray) and pre-heat your pan.  Pour the batter into the pan to the desired pancake size and make pancakes.

Top with Pure Maple Syrup for a yummy treat!

***Not you could also use 1 tsp. Pumpkin Pie Spice in place of the cinnamon, nutmeg and allspice, but I didn't have any so I just used the three spices individually.

Thank you for checking my blog out.  Have a great day and hope you will visit again soon!

~Sarah Strubhar
Independent Team Beachbody Emerald Coach

Monday, February 16, 2015

Clean Eating Pita Pizzas

We LOVE pizza, but I have come to not enjoy Take-Out Pizza very much as it doesn't seem to set well with me.  So, when I saw this idea, I thought why not, let's try it!  Now we have them at least weekly and sometimes 2 times/week if Matt isn't home.  In fact, lately when we are out, Matthew has wanted pizza for dinner and instead of stopping somewhere to pick one up or buy a frozen one with who knows what ingredients in, we come home and make these.  Not to mention, Matthew LOVES helping top his own individual pizza and the fact that it is a personal pizza is a BONUS!

These are SUPER easy, take very little time and are pretty inexpensive!  In fact the time that you would call and order take-out pizza, you can have these made, eaten and dinner pretty much cleaned up and still be waiting on the pizza.  I hope you enjoy them as much as we do!!

Clean Eating Pita Pizzas

Ingredients:
100% Whole Wheat Mini Pitas (must be whole wheat or whole grain to be considered clean)
Olive or Grape seed oil
Shredded Part Skim Mozzarella Cheese
Natural Pizza Sauce (or pizza sauce with as few ingredients in at; as well as being able to pronouce the ingredients in it)
Add veggies that you love, I usually use fresh peppers and sometimes mushrooms, but you can use what ever you like or just keep them plain, or experiment with sliced chicken, ground turkey etc.  Matthew likes pepperoni on his so he usually gets that - hey, he can have a little fun even though they aren't considered clean.

Directions:
- Pre-heat oven to 350 degrees.
-  Arrange pitas on a cookie sheet and lightly brush with oil. Top with pizza sauce, veggies and mozzarella. You don't need to overdo the sauce either or it will make the crust very soggy.
-  Bake until cheese is melted (about 5-10 minutes). Enjoy as an appetizer, snack or pair it with a mixed green salad and veggies to make as a meal! 


1 SERVING = 1 Pita Pizza

Thanks for checking this out!

~Sarah Strubhar
Independent Team Beachbody Emerald Coach

Sunday, February 15, 2015

Sauteed Brussel Sprouts w/ Lemon

So, have you ever tried Brussel Sprouts??  I had never tried them and only ever thought they were bitter and not good at all.  I guess I heard too many times as a kid, that brussel sprouts weren't good and how nobody likes them.

Well, I recently had company visiting and mentioned how I had never tried brussel sprouts and wanted to try them.  So, they decided to make them one night and they were WAY better than I ever thought, not to mention, I actually LIKED them.

Now getting my kids to like them, well that will continue to be a work in progress, but hey working on it.  Here is the recipe I had that night.

Sauteed Brussel Sprouts w/ Lemon

Ingredients:
2 pounds Brussel Sprouts, thinly sliced
3 tbsp. Olive Oil
1 tbsp. Lemon Juice
Parmesan Cheese for topping
Slivered or Crushed Walnuts, toasted

Directions:
-  Pre-heat a medium skillet over medium to medium-high heat.

-  Pour the olive oil and lemon juice in the pan and let the mixture get hot.

-  Add the thinly sliced Brussel Sprouts and cook until just tender.  DO NOT OVERCOOK!!!

-  Sprinkle them with the parmesan cheese and toasted walnuts just before serving.

-  To toast the walnuts, pre-heat a oven to 400 degrees and spread the walnuts on a baking sheet.  Bake the walnuts until they smell done (about 5-10 minutes or so).

-  Serves about 6 and ENJOY!

Thanks for visiting!

~Sarah Strubhar
Independent Team Beachbody Emerald Coach

Zucchini & Squash Saute

I love the traditional veggies (green beans, peas, carrots, squash), but this past fall I started trying new veggies & ways to prepare the traditional veggies I have always liked.  While I have always enjoyed zucchini & squash, it was one of those veggies I used to only eat it in the summer when we would grill it with a ton of butter.

But, this past week, I wanted a change in veggies and decided to pick up some zucchini & yellow squash.  I was trying to decide how to cook them and decided I steam most of my veggies and have roasted veggies a lot lately as well, when I figured why not saute them?!?!  Then my next dilemma was, what am I going to saute them in considering in the past I would have used vegetable oil or butter.  Which is when I remembered I had coconut oil in my pantry let's try it.

Once again, as with other recipes, I was pleasantly surprised how AWESOME the squash tasted.  I thought the coconut oil added a hint of sweetness to the squash.  In fact, I loved it so much I am planning to make it again this week.

ENJOY!!!

Zucchini & Squash Saute

Ingredients:
2-3 medium Yellow Summer Squash, sliced thin
2-3 medium Zucchini Squash, sliced thin
Sea Salt
Fresh Ground Black Pepper
Garlic Powder
1 tbsp. Coconut Oil

Directions:
-  Thinly slice the squash.
-  Preheat a medium sized skillet over medium to medium-high heat and melt the coconut oil in the pan.
-  Add the squash to the pre-heated pan and season with salt, pepper & garlic powder as desired.
-  Saute for about 10-20 minutes depending on how thick or thin your slices are as well as how full the pan is.  Just saute the squash until they are tender.


*When I cooked this the first time I only had green zucchini squash but I am making it this week with both yellow summer squash & zucchini and can't wait.

ENJOY!!

~Sarah Strubhar
Independent Team Beachbody Emerald Coach


Monday, February 9, 2015

PiYo - Weeks 3 & 4 DONE!!

Hello All!

Well, it has been 2 weeks since I have posted about my PiYo journey and I am sorry.  My computer was out of commission most of the week last week, but have it back now and ready to keep moving forward.

So, I have finished weeks 3 & 4 (last week) and what a difference I have been able to see already.

Week 3

Week 3 was a week where I started transitioning from the basic workouts of getting to know the moves into some of the more challenging workouts.  During my first two weeks, I was glad to focus on my alignment and getting the moves right.  But, week 3 uped the ante just when I needed it.  I completed a Buns workout for the first time and the Strength Intervals for the first time as well.

The buns workout definitely worked my hamstrings and glute muscles which felt great.  As for the strength intervals, I was pleasantly surprised by.  When I started this workout I was thinking 'oh a mix of Pilates & Yoga, not much cardio likely' well I was MISTAKEN.  The Strength Intervals kicked my butt the first time, but in a FANTASTIC way.

Week 4

As for Week 4, I tried 2 more different workouts - a different core workout and a new full body workout.  By the time Friday rolled around, which is the scheduled rest day of the week, I was thankful for that day.  Lately I would still do a pretty intense workout on my scheduled rest days, but not this day.  I needed the rest day, my entire body needed a day to recover.  Sometimes the best thing to do is listen to your body and give it what it needs.

So, instead of doing Body Combat as I did the 3 weeks prior, I still got a workout in but more of an upper body workout.  It felt great to get moving, but I didn't overdo it.  I was back at it Saturday and Sunday and felt great.

Any Changes Yet???

You might be wondering if I have noticed any differences or changes since starting the program. And, the answer is YES!!!!  While I may not be seeing much of a difference with my outward appearance, I have noticed a difference in how I feel inside.  I am becoming stronger physically and mentally.  In addition, one thing I have physically noticed is my flexibility is MUCH better!

I haven't taken my measurements since starting the program, nor have I taken 30 day pictures yet.  However, as much as we shouldn't live our lives by the scale, I have lost 3lbs., so I will be anxious to take those measurements this week and see if there is a difference there as well.  Stay posted.

UPDATE (2/11/2015):  I have since taken my measurements since I originally posted this on Monday and I was pleasantly surprised by my results.  I am done 7.5 inches overall so far and 3 pounds.  I couldn't believe it was that much!  I could tell my waist had gotten a little smaller as I have recently had to go back one more hole on my belt, but didn't realize I had lost that many overall inches in just 4 weeks.  Working out with using ONLY your body weight really does work and I am so excited to go on vacation and be able to take this with me and not have to worry about weights or trying to find a place to exercise!

If you are interested in finding out more about PiYo, let me know I would love to share this AWESOME experience with you!  It is fantastic for all levels of fitness!

If you missed Weeks 1 and 2, check out my posts from Week 1 here and Week 2 here.

Thanks for reading and have a FANTASTIC day!

~Sarah Strubhar
Independent Team Beachbody Emerald Coach

Sunday, February 8, 2015

Clean Eating Taco Salad Filling

I LOVE Tex-Mex/Mexican food anytime and LOVE finding new recipes to try out at home.  Give me a taco of any kind and I am one happy girl!  But, I don't know about you when I would make tacos, I always would buy the pre-made big brand name (or off brand, whatever) of taco seasoning mix.  I would try and buy the lower sodium packets, but it would never fail, I would be DYING of thirst within in an extremely short period of time.  Speaking of sodium, the lower sodium packet of taco seasoning I have right now has 260mg. of sodium in for 1 tablespoon; that is about 1/5th of our daily intake of sodium.  Add that to the salt that's in those taco shells and no wonder I was always dying of thirst.

While I was grocery shopping on Friday morning, I had talked to a neighbor/friend and confirmed plans to go over that night to hang out and have a drinks (gasp, yes I said a few drinks. - You can still have a drink in moderation even when eating healthy).  All my good clean recipes were at home and since I haven't made them enough to have them memorized, I wasn't sure what I was going to take.  So, we came home and I was determined to find a recipe that I had all the ingredients for in my house and was easy to prep and transport.  And, voila, I found this recipe.  I have made a couple adjustments from the original recipe, but it is still DELICIOUS!

I hope you enjoy it as much as we did!

Clean Eating Taco Salad Filling

Ingredients:
1lb. Lean Ground Turkey
1 tbsp. Oil
1/2 large Yellow Onion, chopped
1 medium Bell Pepper, chopped
1/2 - 3 tsp. Garlic Powder
1-2 tbsp. Cumin
1-2 tsp. Chili Powder
1/2-1 tsp. Sea Salt
1/2 large Jalepeno Pepper, chopped
1/2 - 3/4 can (15oz.)
of Black Beans - drained

Toppings Optional:
Lettuce
Tomatoes
Spinach Leaves
Shredded Cheese
Greek Yogurt
Olives
Guacamole
Cilantro
Homemade Tortilla Chips (click HERE for the recipe)

Directions:
- Pour the oil in a medium skillet and pre-heat to medium heat.  Then add the turkey.  Cook the turkey until about half done.  Then add the onion and pepper and continue cooking until the turkey is cooked through.

- Once the turkey mixture is cooked thoroughly, begin adding the spices of garlic, cumin, chili powder and sea salt.  I started out on the lower end of the measurements listed but continued to add a bit more until it was to the taste I desired.

-  Once the spices are mixed in and you have the meat to your desired liking, pour in the black beans stir to combine and heat until beans are heated through.  Then turn the heat to low until you are ready to serve.

-  In the meantime, prepare your desired toppings.  Once you have everything ready, enjoy!

Thanks for checking the recipe out!  I hope you enjoy it as much as we all have.

~Sarah Strubhar
Independent Team Beachbody Emerald Coach

Homemade Tortilla Chips

I don't know about you, but I used to be able to sit and eat a half a bag of store bought tortilla chips in no time at all without even thinking about it (oh yeah and that was less than 1 year ago I would do that).  But, now I try not to buy them as much for many reasons 1) without them in the house I won't be tempted and 2) they go stale if I do buy them since we don't eat them as quickly.

But, I always have whole wheat tortillas in the house.  I am not just talking 1 pack I am talking multiple packs.  So when I made the clean eating taco salad the other night, I thought, now what am I going to use for the "chips" portion.

Ta-da, I pulled out some tortillas and made my own chips.  They were easy and I didn't feel guilty eating them either.  They were made with whole wheat and baked, not fried.  Enjoy!

Homemade Tortilla Chips

Ingredients:
Whole Wheat Tortillas (I used a whole pack of 8 large ones since I wasn't sure how many people were going to be eating them)
Olive Oil Cooking Spray
Garlic Powder OR Sea Salt

Directions:

- Pre-heat oven to 350 degrees.

-  On a cutting board or cutting mat, stack your tortillas and use a pizza cutter to cut them in triangles to whatever size you would like.

-  Then line a baking sheet with parchment paper and spread an even layer or tortillas on the baking sheet.

-  Spray the tortillas lightly with the olive oil cooking spray.  Once sprayed, sprinkle garlic powder, salt or any other seasoning of your liking lightly over the chip pieces.

-  Place in the pre-heated oven and bake 10-15 minutes.  Pay close attention to them near the end as they will burn quickly.  I cooked mine for 10 minutes and let them cool on the cookie sheet for a few minutes.  They weren't all that crispy when I pulled them out of the oven, but the became crispy after sitting for a bit.


-  Enjoy by themselves or with the Clean Eating Taco Meat Filling as salad (click HERE for the recipe).

Thanks for checking out my recipe.

~Sarah Stubhar
Team Beachbody Independent Emerald Coach

Tuesday, February 3, 2015

21 Day Fix - Part 2 - Fitness Portion

Hello Everyone!

Welcome back and thanks for checking back in.  As promised, I wanted to give you a review of the fitness portion of the 21 Day Fix Program.

As I said previously, not only do you get the nutrition plan and containers, BUT you also get 7 great workouts to do + 2 bonus workouts when you order through me as your BeachTbody Coach!  The workouts are a great mix of cardio and weight training, as well as Yoga and Pilates.  Each workout is 30 minutes long (but one or two are 32 minutes long) and they for sure get you moving!

Let me tell you this much, I did 21 Day Fix after completing a round of Shaun T's Focus T-25 and thought to myself during the first workout, seriously, this is nothing compared to T-25, but I was wrong.  I was worked from head to toe and every muscle in my body felt it!

MY RESULTS:

As for my results from the program, I have gotten into jeans that I NEVER (and I mean NEVER) thought I would ever wear.  I mean, I wasn't even this size in high school or college.  As well as, I remember 3 years ago the first time I stepped foot in the gym I got on a Body Mass scale and it gave me a print out of what my ideal weight should be for a person my height and for three years I looked at that number and thought, yeah right, who are they kidding, that is never going to happen.  Well, with 21 Day Fix and honing in on my portion sizes, it has happened!!!!  This would have NEVER happened if I were still going to a gym likely, as I had no idea about my nutrition and what was the right stuff and the wrong stuff to eat.  I mean, seriously back then I was in the mindset, well I am going to the gym 5-6 days a week, I can eat whatever I want, but DEFINITELY not the case at all now!

These workouts are great for male or female no matter what your fitness level is.  It is great for beginners and those who have been exercising for a while.  Also, just because the program says 21 days, you can go through the routine multiple times in a row to maximize your results.

If you are interested in more, I would love to share more information with you and answer any questions you might have.  Please send me a message and I would be happy to help you out!


Thanks for your time and have a great one!

~Sarah Strubhar
Independent Team Beachbody Emerald Coach

Monday, February 2, 2015

What the Heck is 21 Day Fix Anyway?!? - Part 1


Hello Everyone!

CLICK HERE FOR CHALLENGE PACK INFORMATION
Holy cow, it's the first week of February already, where has January gone?  Did you set some New Year Resolutions for yourself?  If so, how are you doing with them?

I am sure you have seen my posts occasionally about a program called 21 Day Fix and you might be wondering, "what the heck is this 21 Day Fix thing Sarah is talking about?"  Well, you have come to the right place, because I will go over a bit about what the program is all about!

First, let me start by saying, I LOVE this program (I know I say that about PiYo, Focus T-25, and Body Combat), but I really do and I love each program for different reasons.  The one thing I LOVE so much about this program is it makes eating right SOOO EASY!  That's right, I said EASY!

Why you might be asking - well because it comes with a nutrition plan but the best part is, it comes with 7 color coded containers for each type of food group and the nutrition plan tells you how many containers of each color you should be consuming per day.  Believe me, when I opened my 21 Day Fix package this past fall, I thought no way in heck will I feel full by eating just what is in this container, but let me tell you, I WAS WRONG!  I said it, I WAS WRONG!  The containers are sized for the EXACT size your portion should be.  So you want to see a couple examples of the containers in use...take a look below!

It is amazing how when we fuel our bodies with the right foods, how much fuller we feel.  Is it is diet, NOPE?  It is learning a lifestyle change and knowing how big our portions should be, not what everyone tells us they are to be!  In fact, there were many days, when I thought 'holy cow, I can't consume the rest of the container, I am full already.'  But, it all worked out!  Oh yeah, and I was able to eat carbs - whole grain carbs, but carbs still and I will say that is one of my weaknesses and always will be!


The nutrition part has completely changed when, how & what I eat.  I can't say enough good things about it.


Are you interested in learning more????  Contact me and I would love to tell you more about this AWESOME program.  There is a great deal going on the month of February - order the Challenge Pack and get the workout for $10.

Keep your eyes opened, I will be posting PART 2 - the workout details this week!

Thank you for your interest!

~Sarah Strubhar
Independent Team Beachbody Emerald Coach

Sunday, February 1, 2015

Roasted Butternut Squash Soup

It is winter and there is nothing I enjoy more than a great bowl of homemade soup!  It has been my goal this winter to find some great homemade soups that follow our clean eating lifestyle. 

Recently, we had friends visiting from Maine.  When they arrived, they had only planned on staying 4 days, but due to some unforeseen circumstances, they ended up staying for about 10 days.  I sincerely enjoyed having them here and am so grateful we were able to spend the time together.

While they were here, she made a roasted butternut squash soup.  I don't know about you, but I tend to have a list of meals/foods I want to try sometime.  Butternut Squash Soup has been on that list for a VERY long time.  So, needless to say, I was so excited when she made the soup and was even more excited when I tasted it and realized how WONDERFUL it was.  The next step was for me to figure out good swaps for a couple of the ingredients she used.  So, that is exactly what I did today!

Below is the recipe I came up with.

Roasted Butternut Squash Soup

Ingredients:
1 Large Butternut Squash (I used one that was about 2-3 pounds)
1 Medium Yellow Bell Pepper, seeded
1 Medium Red Bell Pepper, seeded
1 Medium Orange Bell Pepper, seeded
1 Medium Onion
2 Large or 3-4 Small/Medium Carrots
2 Tbsp. Olive Oil
1-2 tsp. Ground Cumin, to taste
1-2 tsp. Garlic Powder, to taste
Fresh Ground Black Pepper, to taste
Sea Salt, to taste
1-2 tsp. Dried Oregano
1-2 tsp. Dried Basil (optional)
4 cps. No/Low Sodium Chicken Broth
1/2 cp. Unsweetened Almond Milk
4 Tbsp. Greek Yogurt

Directions:
-  Pre-heat your oven to 325 degrees.
-  Roughly chop the butternut squash, all bell peppers, the onion, and carrots. 
-  Place the veggies on a baking sheet with edges (I used 2 baking sheets to begin the roasting process). 
-  Drizzle the olive oil over the chopped veggies and sprinkle the veggies with the spices to your liking.
-  Place the veggies in the pre-heated oven for 90 minutes to 2 hours.  About an hour through the cooking time, turn the veggies over and combine the 2 baking sheets to 1 and continue cooking for about 30-60 minutes longer, or until the veggies are tender.
-  Once the veggies are cooked tender, take them out of the oven and let them cool slightly. 
-  After the veggies cool, place them in a food processor and blend until smooth.  You will need to add about 1/2 - 1 cup of chicken broth to help get it smooth.  Then pour into a saucepan.
-  Once in the saucepan, add the remaining chicken broth, almond milk and Greek Yogurt.  Stir to combine and then simmer until heated through.
- ENJOY!!!!